
图解Linux内核 读书笔记(上)
目录
本书提供了大量的插图,很适合用来学习Linux内核。本文是上半部分。
推荐直接来这个网站看linux kernel:bootlin,这个页面是mm.txt的,不过版本较低(v5.0)。也有很多其他重量级开源项目。
本书有很多细节,汇编代码,因此也建议作为科普,工具书阅读。有需要的时候可以回来看看。这里会尽量精简重点内容。目标就是看一遍能有个大概。
书中所使用的两个Linux版本,分别为3.10和6.2。且未说明情况下,以6.2为准。如果某一个版本代码和书中对不上,就去看另一个版本吧。
本页为上半部分,包括内存和文件系统
另外学习过程中也发现了一些值得推荐的文档、博客:Linux系统内核5.10.14-Linux内核教学
概述和基础知识
-
内核代码结构:
- Documentation:文档
- arch:和体系结构有关的,或者是其他模块中需要区分体系结构的内容
- kernel:核心部分,包括进程调度、中断处理、时钟等,和体系结构相关的会放到/arch/xxx/kernel
- drivers:驱动
- mm:内存管理,同样也会有在/arch/xxx/xx下
- fs:文件系统,一种文件系统拥有一种子目录
- ipc:进程间通信
- block:块设备管理
- lib:内核空间下的通用函数库
- init:内核初始化
- firmware:由外部设备的芯片运行的固件程序
- scripts:内核配置脚本
- 其他(本书不涉及的):net、crypto、certs、security、tools、virt(虚拟化)
-
基础数据结构
-
Linux目前仍以C为主,所以其数据结构,以struct、和container_of等宏的方式形成,不像其他面向对象的语言提供的那种数据结构的形式
// 再复习一下 container of // typeof 是gnu c关键字 #define container_of(ptr, type, member) ({ \ const typeof(((type *)0)->member) * __mptr = (ptr); \ (type *)((char *)__mptr - offsetof(type, member)); }) #define offsetof(TYPE, MEMBER) ((size_t) &((TYPE *)0)->MEMBER) -
一对多的描述方式:将链表结构嵌入到有需要的数据结构中
// 方式一 struct branch { struct list_head head; // other member }; struct leaf { struct list_head node; // other member }; // 用于串联的list_head struct list_head { struct list_head *next, *prev; }; // 方式二,节省空间但有一些不便 struct hlist_head { struct hlist_node *first; }; struct hlist_node { // pprev是前一个hlist_node的next指针的地址 // 即若prev => curr, curr->pprev == &prev->next struct hlist_node *next, **pprev; // other member }; -
多对多的描述方式:将多对多联系,抽象为connection结构体,再嵌入到有需要的数据结构中
示例,这只是一个选课场景(学生-老师)下的示例,表示c语言具备的多对多抽象能力。 实际场景中,设备-设备处理程序,就是一个类似的多对多的关系。
// 书上的示例描述了一个老师-学生的多对多场景
// 一个学生可以有多个老师,一个老师可以有多个学生

// 具有同一个老师的某些学生
struct s_connection {
    // 连接到下一个s_connection
    struct list_head node;
    // 指向一个学生
    struct student *student;
};

// 具有同一个学生的某些老师
struct t_connection {
    // 连接到下一个t_connection
    struct list_head node;
    // 指向一个老师
    struct teacher *teacher;
};

// 因为师生关系一定是双向的,所以可以将两种联系合并, 代表一个学生-老师的联系
struct connection {
    // 其他具有相同老师的connection
    struct list_head s_node;
    // 其他具有相同学生的connection
    struct list_head t_node;
    // 当前老师
    struct teacher *teacher;
    // 当前学生
    struct student *student;
};

// 最后,每个学生和老师的数据结构
struct teacher {
    // 连接到connection中的s_node
    // 遍历该s_node的connection,可获得所有的student
    struct list_head head_of_student_list;
    // other member
};
struct student {
    // 连接到connecton中的t_node
    // 遍历该t_node的connection,可获得所有的teacher
    struct list_head head_of_teacher_list;
    // other member
}
-
-
设计模式:注意内核的设计方式,是面向对象的
- 模板方法模式:Template Method。即开发者实现固定的接口,系统会根据流程进行调用。
- 观察者模式:内核中,xxx_listener、xxx_notify
-
中断
广义的中断可进一步细分为中断(interrupt)和异常(exception)。更进一步的,中断分为可屏蔽和不可屏蔽,都是来自I/O设备的。异常则是程序主动进行的,包括陷阱、故障和终止。不论是哪种,CPU只会在一个指令执行完成后再检查,不会在执行中检查。
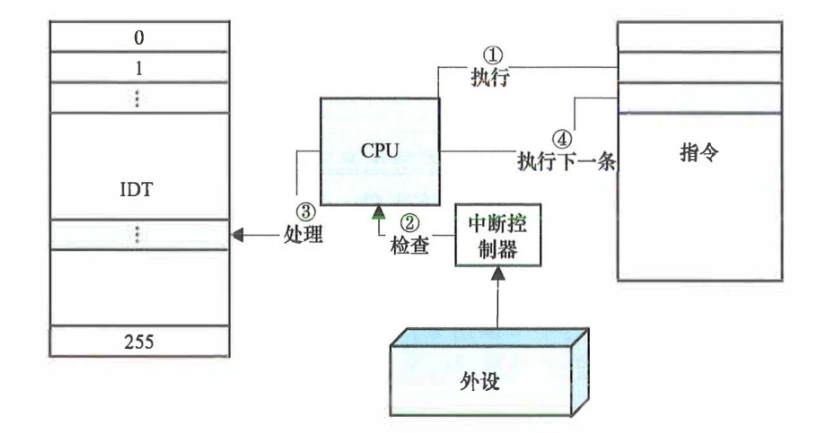
中断处理需要软硬件分工合作。中断控制器和CPU相连,单CPU架构和SMP架构中分别是PIC(可编程中断控制器),IOAPIC(高级可编程中断控制器)。CPU提供了处理的指令、以及相应的寄存器位来存储。
区分两个概念:中断处理程序是指整个处理过程,从保护现场、处理、恢复现场。中断服务例程是其中的一部分,是专门处理产生中断的设备的相关逻辑的。中断服务例程涉及到两个关键的结构体:
irq_desc、irqaction,是一对多,因为一个中断是可以被共享的。一个irq号对应一个irq_desc,会有通用的handler,而一个irqaction则代表一种设备更具体的处理,会有自己的handler供irq_desc中的handler调用。Top Half和Bottom Half,一些函数可看到th、bh的后缀,代表前半段、后半段。中断处理应当快速,头半段不能做复杂的处理。复杂逻辑应当使用工作队列、软中断,或启动单独的线程工作。
注册
irq_desc和irqaction的方式。int request_threaded_irq(unsigned int irq, irq_handler_t handler, irq_handler_t thread_fn, unsigned long flags, const char *name, void *dev); int request_irq(unsigned int irq, irq_handler_t handler, unsigned long flags, const char *name, void *dev);这里有一个具体的例子,键盘和鼠标等外设,可以是共享相同irq(例如200)的设备,但是二者并不会直接拉起一次中断处理程序,会是由GPIO再发起一个irq(例如50),GPIO的设备将会负责相应的
irq_desc的处理。键盘和鼠标只需要完成自己的对应200的,irq_desc,irq_action。共享中断需要该设备的驱动能够区分出来,是否是自己设备发出的,如果不能,那么不能进行共享。中断处理还有很多细节:比如中断处理时,又有新中断发生(一般来说是会继续处理最新的中断,如果有多个新中断,会丢失中间的);是否还有软中断需要处理;中断处理结束后,需要返回内核态还是用户态等
软中断:对于timer、tasklet等,内核支持一些软中断来完成这些事情。主要包括定时器,小任务,网络读写,块读写等。注意这里说的都是内核空间的事情,是内核可以使用的能力。
从处理流程上来看,系统调用其实也是中断(异常)的一种。因此减少系统调用对优化是有一定作用的。
-
Linux的时间
内核的时间功能分为两种:一个是作为时钟源,提供时间戳信息。另一个是提供时钟中断,以供一次性或周期性事件的触发。
内核的时间单位:jiffy,滴答。以及
ktime_t。核心的数据结构,
timekeeper、clocksource、clock_event_device时钟事件。时钟源是有等级的,内核会选择一个作为“看门狗”,其他时钟源可以受此监督,如果某个其他时钟源误差过大,将会置为不稳定。时钟芯片有很多种,RTC、PIT、TSC、HPET、APIC Timer。
内核维护的事件有多种,常见的有:REALTIME(系统时间,也是WALL TIME墙上时间)、MONOTONIC(非休眠时间)、BOOTTIME(启动时间,包括休眠)
时钟中断是触发进程调度的最常见的情景之一。在中断章节中也可以,这种情况下,中断程序负责标记进程需要调度,并在中断返回时,内核态下检查标记在内核态进一步完成调度。
内存管理篇
内存寻址
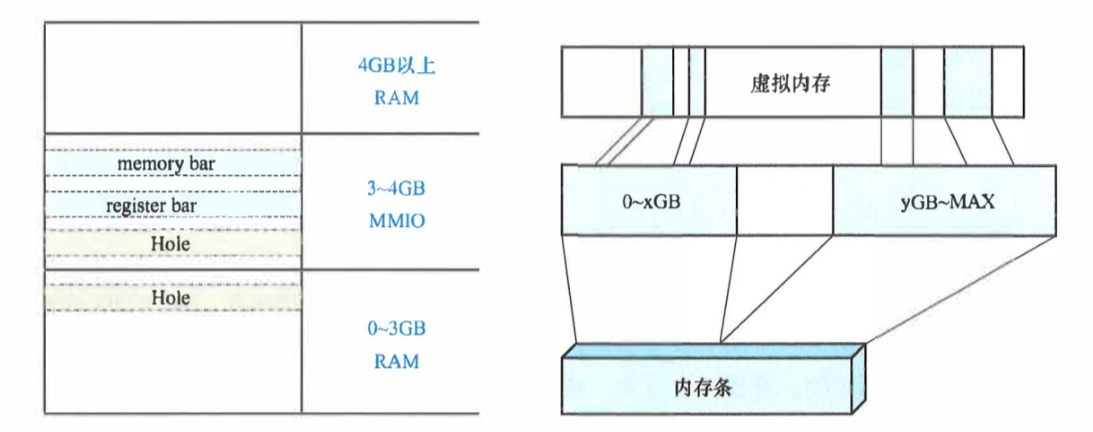
广义的内存管理,也就是CPU所说的内存管理,其实是包括所有有效的连接在总线上的存储。换言之CPU访问的物理地址并不一定真的在RAM里。
既然内存空间包括多种存储设备,Linux系统将会把所有的这些映射到内存空间中,即MMIO(memory mapped io)。可以通过/proc/iomem。设备寄存器、显存等都可以是MMIO的一部分。不过这一点需要CPU架构的支持。
而且内存空间并不是连续的,会有一些用不到的空洞Hole。
内存管理,实际上需要维护内存介质(RAM + MMIO)、内存空间、虚拟内存三者之间的关系。其中前两者之间的映射,由BIOS完成。
Linux中共有三种地址:虚拟地址(Virtual Address)、线性地址(Linear Address)、物理地址(Physical Address)。应用程序使用的是虚拟地址,虚拟地址通过分段机制(用户代码段、用户数据段、内核代码段、内核数据段)后就变为线性地址。内存管理单元MMU将会用分页机制,把线性地址转换为物理地址。Linux上虚拟地址和线性地址其实几乎相同(段描述符基准地址为0)。
MMU寻址部分就是多级页表的机制。32位和64位有一些区别。这里强调几点:寻址由MMU硬件完成,各级页表项所包含的地址都是物理地址。页框是指划分好的一块连续的物理内存,而页/页面是指对应页框大小虚拟内存。P.S.:可以再去复习一下CR3寄存器(PDBR)、PTBR。页表的加载和寻址是从CR3赋值开始的,这一数据存储在每个进程的进程控制块task_struct中。
即使有了MMU,操作系统仍然需要完成虚拟地址到物理地址的映射的建立。就是说页表需要操作系统来设置,内核提供了大量的函数和宏来做这些事情。如果有需要,这里可以结合一些博客来学习,强烈推荐如Linux Kernel直接映射区的构建、Linux Kernel内存管理之分页。另外也可以考虑参考Intel x86-64开发人员手册,该手册内有很多图表值得一看。不看这些博客的话,简单看一下下面也可以。
目前分页最多的时候有5级页表,页全局目录PGD、页四级目录P4D、页上级目录PUD、页中级目录PMD、页表PT(第一级)。而且一般如果只有2级,则P4D、PUD、PMD的项数均为0,即10、0、0、0、10,最后页表内有12位物理地址偏移,总共32位。常规4K页面的分页下的一个内核直接映射内存区的页表建立方法如下:
内存直接映射区:内核空间中一个大的,连续的虚拟内存空间,他映射了部分或所有物理内存。
/*
* 页表导航说明:
*
* pgd, p4d, pud, pmd, pte 均为指向各级页表项的虚拟地址指针。
* pfn(页框号)为物理页帧编号,此处为 0x12,对应物理地址 0x12000(即 0x12 << PAGE_SHIFT)。
*
* 本代码目标:为指定的物理页帧 pfn 建立对应的页表映射(线性地址空间中)。
*/

// 计算给定物理页帧在线性地址空间中的 PGD(Page Global Directory)索引
// 注意:(pfn << PAGE_SHIFT) + PAGE_OFFSET 将物理页帧转换为对应的线性地址(内核线性地址直接映射区)
// PAGE_OFFSET 是内核线性映射的起始虚拟地址偏移(如 0xFFFF888000000000 在 x86_64)
pgd_idx = pgd_index((pfn << PAGE_SHIFT) + PAGE_OFFSET);
pgd = pgd_base + pgd_idx;  // 获取该线性地址对应的 PGD 项指针

/*
* 在当前配置(通常为 4-level 分页但启用兼容模式或线性映射平坦)下,
* p4d、pud、pmd 层级可能被折叠或直接透传,因此偏移量为 0。
* 使用 p4d_offset/pud_offset/pmd_offset 获取下一级页表指针。
*/
p4d = p4d_offset(pgd, 0);
pud = pud_offset(p4d, 0);
pmd = pmd_offset(pud, 0);

/*
* 检查 PMD 项是否已存在且有效(即指向一个页表页)。
* 如果对应页表页未分配(_PAGE_PRESENT 位未设置),则需分配一个新页表。
*/
pte_ofs = pte_index((pfn << PAGE_SHIFT) + PAGE_OFFSET);  // 计算 PTE 索引(页内偏移)
if (! (pmd_val(*pmd) & _PAGE_PRESENT)) {
    // 分配一个位于低地址区域的物理页作为页表页(页表本身存储空间)
    pte_t *page_table = (pte_t*) alloc_low_page();

    /*
    * 构造 PMD 项值:
    *   - __pa(page_table): 获取 page_table 的物理地址
    *   - _PAGE_TABLE: 标志位,表示该 PMD 指向一个页表(而非大页)
    *   - __pmd(): 将整型值封装为 PMD 类型
    *   - set_pmd(): 安全地更新 PMD 项
    */
    set_pmd(pmd, __pmd(__pa(page_table) | _PAGE_TABLE));
}

/*
* 获取最终的 PTE(Page Table Entry)指针。
* pte_offset_kernel() 根据 PMD 和线性地址中的页内偏移计算出 PTE 位置。
*/
pte = pte_offset_kernel(pmd, pte_ofs);

/*
* 设置 PTE 项,建立最终的物理页映射:
*   - pfn_pte(pfn, prot): 将页帧号 pfn 与访问权限 prot 组合成一个 PTE 值
*   - set_pte(): 将生成的 PTE 值写入页表项
*/
set_pte(pte, pfn_pte(pfn, prot));

/*
* 至此,物理页帧 pfn 已成功映射到线性地址空间中对应的位置。
* 后续可通过 (pfn << PAGE_SHIFT) + PAGE_OFFSET 访问该物理页。
*/
不过注意虽然现代计算机已经开始64位了,但其实并不允许使用全部的64位寻址,而通常只使用48位(而且用户空间为高16位为0,内核空间高16位为1)。中间空洞的地址是非法的,因此实际上一共只能使用256T内存。
其他扩展阅读:linux kernel pwn之ret2dir攻击学习
物理内存的管理
联动一下博客中的:边学边用linux-内存管理
概念:节点(node)、区域(zone)、非统一内存访问(NUMA,和传统SMP架构相对,以socket为区分,将CPU和内存分组为不同的node,一组CPU访问自己组内的内存更快)。可以在lscpu中看到cpu的分组信息。
BIOS提供了SRAT(System Resource Affinity Table)、SLIT(System Locality Information Table)两个表,用来确定系统资源亲和性和延迟的信息。系统会进一步用来控制CPU上进程的对应的物理内存申请。
而zone则是对node内的资源再进行划分。zonelist中存储的就是对node中的内存的划分。划分至少是出于兼容性的考虑,比如有些设备只能访问指定的部分,因此需要将这部分内存保留出来。

内核分配内存时,每一个NUMA节点就会从节点保存的zonelist上寻找。如果有多个node且允许尝试其他node的内存,则需要维护一个更复杂的zonelist(维护所有node的所有zone)。注意不同的NUMA节点,其zonelist会略有差别。总的来说会按照优先本地,优先高位地址的顺序排列。
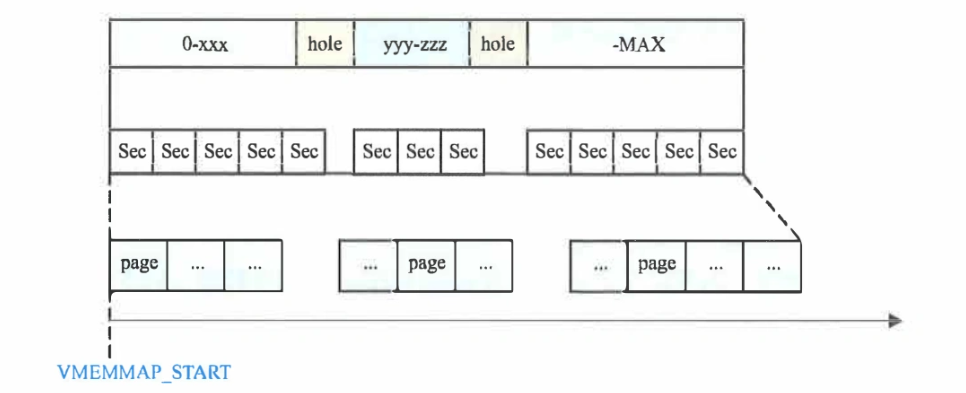
一页物理内存对应一个Linux中的page对象。在这个思路指导下,Linux管理物理内存实际上有三种模式:FLATMEM、SPARSEMEM、SPARSEMEM_VMEMMAP。区别在于对物理内存的认定,以及对page对象的管理方式不同,page对象和pfn(页框号)的转换方式不同。
内存配置情况,可以通过/sys/firmware/memmap查看,这里会列出每一段bios提供的物理内存段。但是注意其中并不是所有的部分都可以用作内存分配,有一些内存会预留给其他模块使用。这些不能用物理内存也称为hole。
- FLATMEM:把内存看作连续的,即使中间有上面说到的hole,这些hole也是有page对象对应的。显然会造成一些page对象的浪费。
- SPARSEMEM:将内存做切分,有效的部分分配若干连续的section,section内是若干page,无效的hole部分不再分配section&page。
- SPARSEMEM_VMEMMAP模式【理解存疑】:依然会为有效的部分分配若干的section,但是要求分配出来的page对象的地址位于虚拟地址连续的区间上。也就是说page对应的虚拟内存地址从一开始就是确定了的。不过只有活跃的部分才会得到真正的物理内存。这种模式下,对于某个物理页而言,其pfn对应的page对象的虚拟地址是
vmemmap + pfn。
区分对内存连续性的要求,虚拟地址连续性是比较好满足的,但仍然有一些场景,比如使用DMA时,可能需要物理地址也连续。
内存申请管理一般有三个阶段:启动程序、memblock、buddy。启动阶段即grub程序,grub程序可以通过mem参数来限制内核可管理的内存上限。memblock也可以通过将内存块加入reserve数据组扣留一部分,最后才是buddy系统管理。对于操作系统而言,memblock是内存管理的第一个阶段,buddy系统会接替他的工作。
内存管理还有更多方案:比如huge tlb,但本书并未讨论。
buddy系统的名字恰如其实。buddy将内存分为不同大小的块,1页,2页,4页…1024页(对应4K、8K、16K…4M)共11个级别(order阶)。如果块的伙伴也是空闲的(实际上已分配出去的块,不再属于伙伴系统),就可以合并为一个更大的块。确定伙伴的规则包括:
- 两个块相邻,且位于同一个zone
- 每个块大小都是2的整数次幂。合并后也要是,所以两个快的阶要相同
- 两个块的地址必须是$2^n$对齐的,合并之后第一个块的地址则需要是$2^(n+1)$对齐的
zone和page是上下层级的关系。完整的层级是section(内存初始化和热插拔单位)→zone(分配管理单元)→page(页)。zone内按照阶,存储了所有阶free_area,其中每个还分为可迁移和不可迁移等类型。具体如下图。
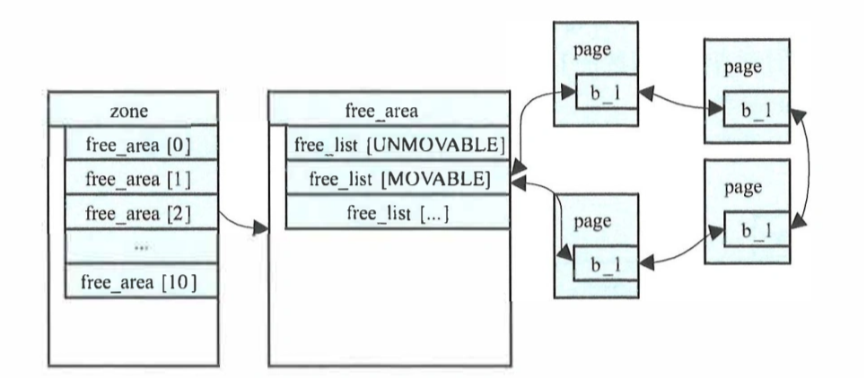
页的申请和释放函数,是上面曾见到过的:alloc_page/pages,free_page/pages等。alloc函数在使用时有很多参数,包含优先选择的zone和其他影响内存分配的行为,比如分配的优先级(是否需要保持zone内的分配水位,更高优先级可以使用一些预留的内存)。
可以看出,buddy系统所能提供的物理内存,要么可以物理地址连续但不能超过4M,要么可以超过4M但物理地址不能保证连续了。
虚拟内存的管理
每一个进程的线性地址空间(虚拟地址)划分分为内核态和用户态。内核态起始位置就是之前见到过的宏,PAGE_OFFSET。而且内核空间实际上是进程间直接、或者间接共享的。可以理解为用户态空间互相独立,内核态空间共享。正因如此,用户空间的页表需要进程自行维护,是用户页表。而内核页表很多情况下是相同的,属于公共的部分。
在x86时期,空间有限,内核虽然一般有1G的线性空间,但是并不能直接映射1G的物理内存。一般只能直接映射一部分(896M),剩下的部分保留满足其他需秋,直接映射的部分叫Low Memory,剩下的部分是High Memory。注意x86时期,物理内存是可以超过4G的,但是线性空间只有4G。
所谓直接映射,就是映射后的虚拟地址和物理地址有直接关系,在前面的代码中也能看到:$va = vp + PAGEOFFSET$。此时映射状态(左侧物理内存,右侧线性空间)
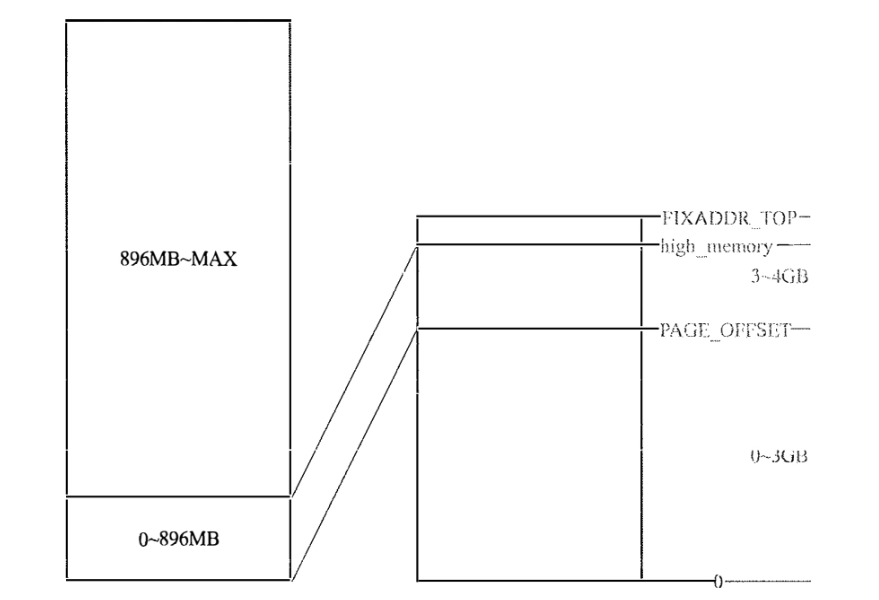
而等到了x86-64时代,线性空间足够大了,不再区分Low/High Memory。
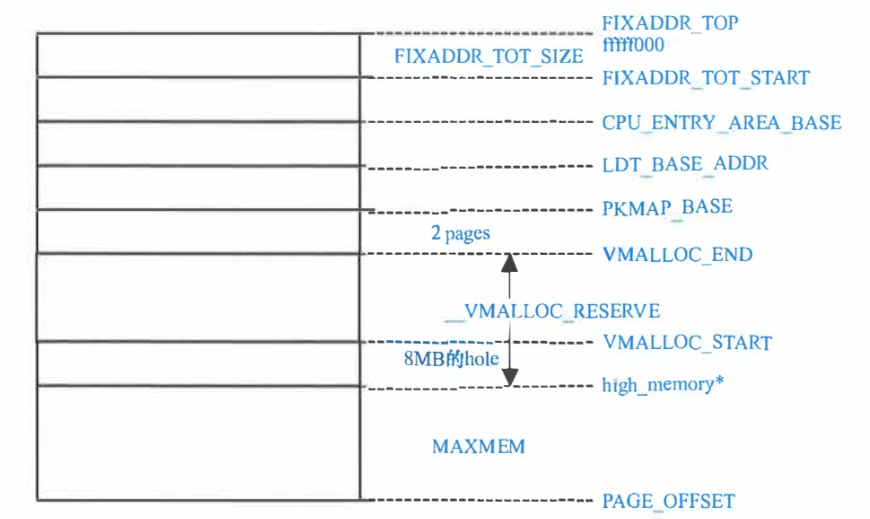
具体来看,内核线性空间(从高地址到低地址)内部还分为若干区域:
- 32位:固定映射区、永久映射区、CPU Entry区、动态映射区、直接映射区
- 64位:-
 上图为32位
 上图为64位
64位可能有4、5级页表等不同情况,这里是5级的布局。
接下来介绍一下内核线性空间中的各个区:
- 直接映射区:大小理论上是MAXMEM,不考虑
High Memory的情况下,会一直映射到没有物理内存为止。映射完成后在运行期内不变,因此需要稳定存在的数据结构需要用直接映射区。 - 动态映射区:其他区域多少都有限制,但动态映射区能满足各类需求。常见的
ioremap都在此区域实现。由get_vm_area函数族来分配此区域空间。用红黑树管理。 - 永久映射区:x86-64上已经不再有这一区域。内核使用
kmap函数将一页物理内存映射到该区。kmap的参数就是page结构体,如果page对应的物理页在High Memory会占用永久映射区,如果不再,则返回直接映射下的虚拟地址。该区域也只能以页的单位来进行分配。实际上和“永久”并没有关系。可能会用于和一些设备通信的内存区域。 - 固定映射区:内部分为若干小区间,每个区间有特定用途。值得提到的是其中有一个临时映射区,为每一个CPU准备了一些页,通过
kmap_tomic等函数操作物理内存映射到该区域,申请释放都很快,适合临时使用。
详解用户空间内存映射mmap
mmap其实并不陌生,用于将文件/设备映射进内存,后续可以项访问内存一样访问。但要注意mmap使用的一定是用户线性空间。函数原型如下
void* mmap(void *addr, size_t length, int prot, int flags, int fd, off_t offset);
int munmap(void *addr, size_t length);
其中flags有一些讲究了,比如MAP_PRIVATE、MAP_SHARED。前者采用COW策略(Copy On Write),对映射区的更新将会对其他映射了同一区域的进程不可见,也不会写回文件。后者则是共享所有更新,并且会写文件。这里提前说一下,共享是针对物理内存的,后面会详细展开。大的费雷上,mmap分为匿名映射(不由文件映射而来)和非匿名映射(有具体映射的文件/设备)
当然,由于mmap也可以映射设备,因此并不是所有对文件的操作都可以用,具体支持情况依赖于设备驱动。
用户线性空间是以vm_area_struct来描述一个一个的用户线性空间中的区域的。进一步整合到进程结构体中的mm_struct。
/*
 * This struct defines a memory VMM memory area. There is one of these
 * per VM-area/task.  A VM area is any part of the process virtual memory
 * space that has a special rule for the page-fault handlers (ie a shared
 * library, the executable area etc).
 */
struct vm_area_struct {
	/* The first cache line has the info for VMA tree walking. */

	unsigned long vm_start;		/* Our start address within vm_mm. */
	unsigned long vm_end;		/* The first byte after our end address
					   within vm_mm. */

	/* linked list of VM areas per task, sorted by address */
	struct vm_area_struct *vm_next, *vm_prev;

	struct rb_node vm_rb;

	/*
	 * Largest free memory gap in bytes to the left of this VMA.
	 * Either between this VMA and vma->vm_prev, or between one of the
	 * VMAs below us in the VMA rbtree and its ->vm_prev. This helps
	 * get_unmapped_area find a free area of the right size.
	 */
	unsigned long rb_subtree_gap;

	/* Second cache line starts here. */

	struct mm_struct *vm_mm;	/* The address space we belong to. */
	pgprot_t vm_page_prot;		/* Access permissions of this VMA. */
	unsigned long vm_flags;		/* Flags, see mm.h. */

	/*
	 * For areas with an address space and backing store,
	 * linkage into the address_space->i_mmap interval tree.
	 */
	struct {
		struct rb_node rb;
		unsigned long rb_subtree_last;
	} shared;

	/*
	 * A file's MAP_PRIVATE vma can be in both i_mmap tree and anon_vma
	 * list, after a COW of one of the file pages.	A MAP_SHARED vma
	 * can only be in the i_mmap tree.  An anonymous MAP_PRIVATE, stack
	 * or brk vma (with NULL file) can only be in an anon_vma list.
	 */
	struct list_head anon_vma_chain; /* Serialized by mmap_sem &
					  * page_table_lock */
	struct anon_vma *anon_vma;	/* Serialized by page_table_lock */

	/* Function pointers to deal with this struct. */
	const struct vm_operations_struct *vm_ops;

	/* Information about our backing store: */
	unsigned long vm_pgoff;		/* Offset (within vm_file) in PAGE_SIZE
					   units */
	struct file * vm_file;		/* File we map to (can be NULL). */
	void * vm_private_data;		/* was vm_pte (shared mem) */

	atomic_long_t swap_readahead_info;
#ifndef CONFIG_MMU
	struct vm_region *vm_region;	/* NOMMU mapping region */
#endif
#ifdef CONFIG_NUMA
	struct mempolicy *vm_policy;	/* NUMA policy for the VMA */
#endif
	struct vm_userfaultfd_ctx vm_userfaultfd_ctx;
} __randomize_layout;

// 这段代码也要在旧一点的版本中才能找到,
struct mm_struct {
	struct {
        // 映射区域链表头
		struct vm_area_struct *mmap;
        // 映射区域红黑树
		struct rb_root mm_rb;
    }
    // ... 其他成员暂时忽略
}
mmap的实现细节,都在do_mmap函数中。
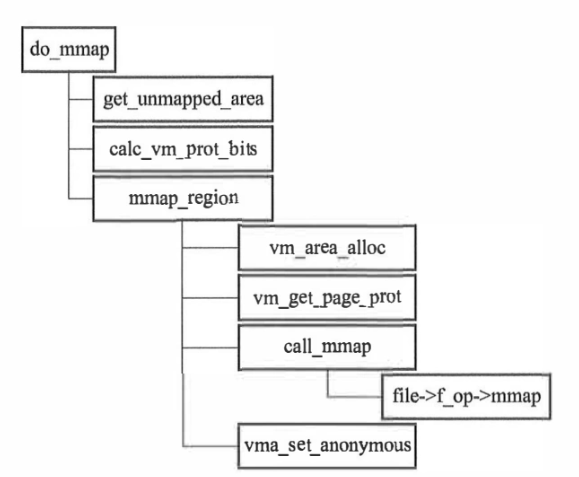
调用流程中,get_unmmapped_area用来获取可用的线性空间(也就是书中所说的“坑”)。物理内存在书中则用“萝卜”指代。如果用户不指定addr的话,这一步会根据当前进程mm_struct对象中mm_mt字段来查找合适区域。如果指定了,并检查了该地址开始的线性空间长度足够则使用,否则忽略addr重新分配。
而mmap_region则进行具体映射。初始化映射对应的vm_area_struct,完成映射,将对象插入红黑树。
物理内存的使用情况,也就是mmap最终的效果主要是由对应的文件/设备提供的驱动决定的。这有几种分类
- 驱动有自己的物理内存(比如MMIO下的显存),驱动可以使用ioremap将其映射到内核线性空间的动态映射区。
- 驱动需要申请内存然后在做映射。这里根据需要还会分为是否要申请连续物理内存。
- 驱动中的mmap不提供映射,由后续的内存访问异常,触发内核调用驱动的fault操作,申请物理内存page赋值给vm_fault字段。
在了解了以上这些之后,就能明白共享内存其实是共享物理内存。不同进程之间需要将同一段物理内存,映射到自己的线性空间内。
书中提到/dev/mem设备,这是一个影射了物理内存的设备,我们可以用mmap将此设备进行映射,并直接操作物理内存。当然这一操作由于危险性极高,很多情况下已经被禁止直接使用(对应的区域禁止映射)。如果要用的话,可能需要编写驱动,以MMIO的方式进行使用。
内存管理进阶
本节讨论一些更复杂的问题。
-
内存申请:
- 申请连续物理内存。在buddy系统之下,内核还维护了slab系统,现在有多个版本,slab、slob、slub。slab内部使用
kmalloc/kfree。起到内存池的作用。受buddy的限制,最大4MB的连续物理内存。 - 申请连续虚拟内存。使用
vmalloc,申请一段一段的物理内存,让后映射到连续的线性空间段上。vmalloc的使用场景是为内核态准备内存,因此更新的是内核页表,而非进程的页表。其虚拟地址在内核的动态映射区。
无论slab还是vmalloc,返回的都是虚拟内存。相比之下,grub、memblock、buddy申请和管理的则是物理内存。
- 申请连续物理内存。在buddy系统之下,内核还维护了slab系统,现在有多个版本,slab、slob、slub。slab内部使用
-
缓存
内存中的数据可以分为两种:页表数据和实际数据。
-
TLB缓存用于加速对页表的访问。TLB是比较特殊的,内核写页表不会通过TLB,而是直接写内存。所以所有页表项更新的情况下,TLB都需要刷新。
-
cache缓存用于加速对普通数据的访问。实际上MMIO也会被cache进行缓存。cache有很多的缓存策略,在x86架构下:
- Strong Uncacheable:UC,读写都不经缓存
- Uncacheable:也是UC,但可以用MTRR(Memory Type Range Register)将其变为WC
- Write Combining:WC,允许CPU缓冲多个写操作,并在合适的时候一次性写回内存
- Write Back:WB,读写都经过缓存
- Write Through:WT,和WB类似,但是写操作也同时写内存
- Write Protected:WP,和WB类似,但是每次写都会导致缓存失效
需要区分明确是因为,并不是所有的场景都可以使用WB这种效率最高的情况,如果写内存有副作用(比如MMIO的内存,可能是设备的控制位),那就不能用缓存了。
MTRR机制可以用来设置一段物理内存的缓存方式。BIOS一般已经配置了,可在
/proc/mtrr文件查看。修改该文件可以更改缓存方式。MTRR有一定限制(硬件相关),所以又有了PAT(Page Attribute Table),粒度是页,可以按照页来精准控制内存的缓存属性。可以在/sys/kernel/debug/x86/pat_memtype_list文件中看到配置。内存和缓存的不一致问题,不仅在于CPU的读写,在DMA设备访问内存的情况下,也会出现不一致的情况。这种时候也需要刷新缓存。
-
-
缺页异常
缺页异常实际上会有不同的种类,CPU提供两项信息:错误码和异常地址。其中错误码存储在栈中,引发缺页异常的虚拟地址存储在CR2寄存器中。
整体上看错误有三种场景:
- 程序逻辑错误:空指针、访问越界、违反权限(写了只读内存)
- 访问地址未映射物理内存
- TLB过时
- COW(Copy On Write)等场景,内存没有写权限。
缺页异常程序是
asm_exc_page_fault,汇编程序【似乎在内核代码中不太好找到实际代码段】。负责保存现场,并收集error_code。最终错误码和异常地址会传递到handle_page_fault。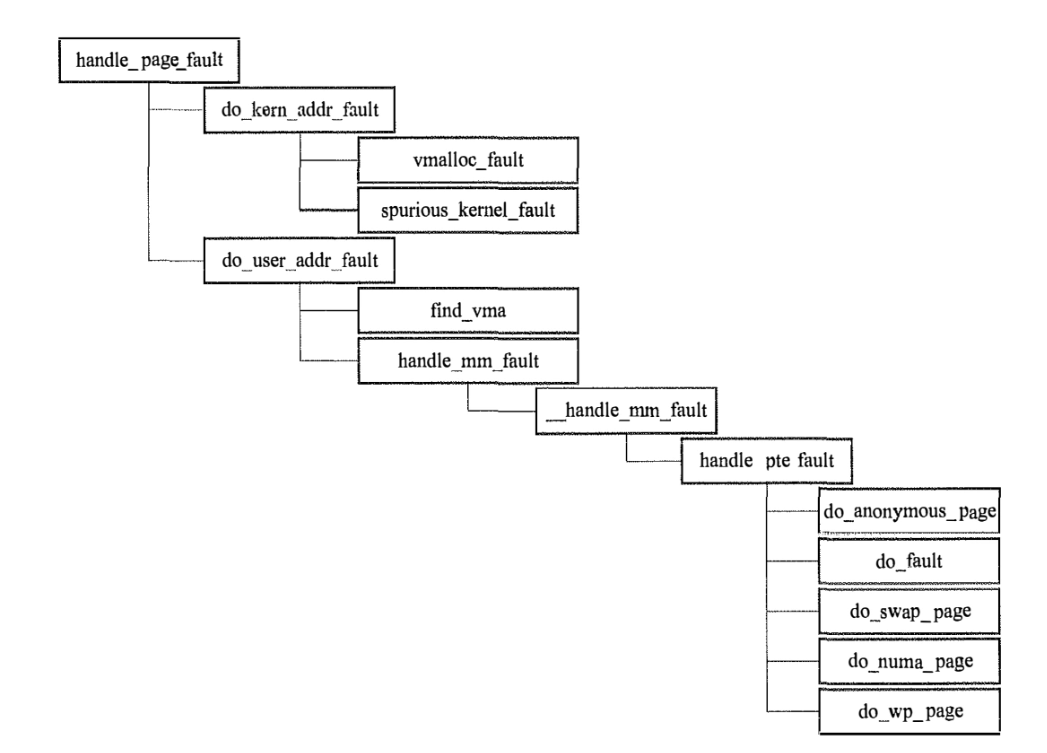
根据地址位于内核还是用户空间,分别调用不同的处理程序。
地址位于内核空间的情况下:如果进程是用户态,那么只有
vmalloc和spurious两种情况可以处理。因为vmalloc的内存分配情况存储在内核页表,使用了vmalloc申请的内存会缺页异常,需要将页表拷贝给进程页表。spurious则是指的TLB刷新不及时(内存已经变为可读写,但是TLB中仍只读)的情况,产生的虚假错误。各种bad_area函数用来处理其它的情况,如果发生缺页异常时,进程处于内核态,会尽量尝试修复错误,否则直接发送SIGSEGV给用户态进程。地址位于用户空间的情况下:核心目标就是为地址找到对应的vma(就是我们前面提到过的vm_area_struct)并映射内存。在确认vma和当前的操作权限匹配后,开始真正的缺页处理。这里还要分为三种情况
- 没有完整的物理内存映射,需要申请内存并映射。
- 映射存在,但是物理页被交换了,需要将其读到内存。
- 映射完整,内存可写,但是页表中权限是只读,写内存异常。这对应的也是前面的COW等场景。
这里需要格外强调:用户空间虚拟内存访问权限分成两个部分。内存映射的权限(在
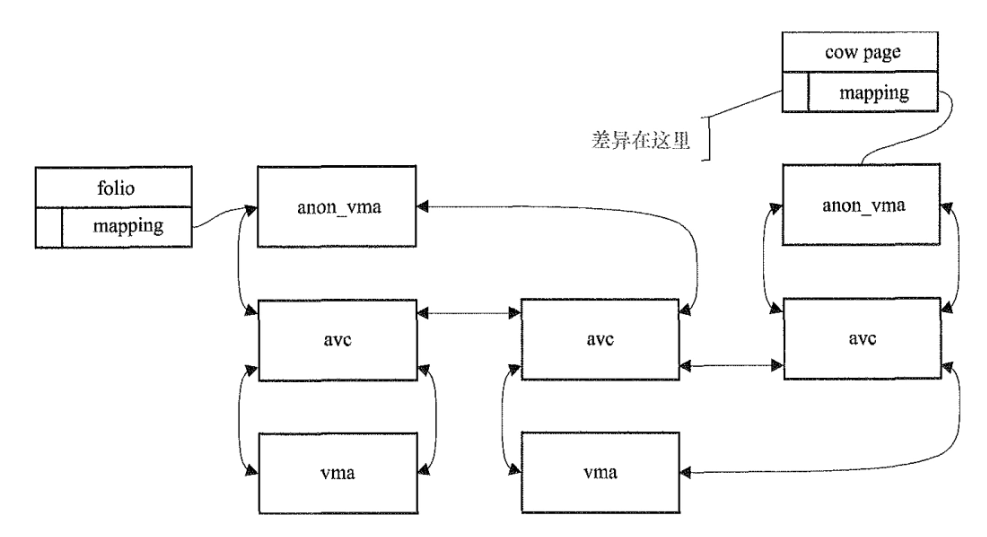
vma->vm_flags中),以及页表的权限。前者是全集,在其之外的是错误,没有讨论余地。后者则是表示实际的访问权限,就是说页表中的权限可能发生变化,来适应对应的需求。另外这里所说的两个权限,都是再vma的结构体中(flag和prot)。而DMA访问内存实际上是用pte访问的,因此内存实际上一共有三个权限在共同工作。handle_pte_fault比较重要,是站在pte的角度,处理以上的这些问题。按照书上的内容,补充了一些注释。static vm_fault_t handle_pte_fault(struct vm_fault *vmf) { pte_t entry; // 这一段if + else,是在处理第一种问题。等待后续分配并映射。 if (unlikely(pmd_none(*vmf->pmd))) { /* * Leave __pte_alloc() until later: because vm_ops->fault may * want to allocate huge page, and if we expose page table * for an instant, it will be difficult to retract from * concurrent faults and from rmap lookups. */ vmf->pte = NULL; vmf->flags &= ~FAULT_FLAG_ORIG_PTE_VALID; } else { /* * If a huge pmd materialized under us just retry later. Use * pmd_trans_unstable() via pmd_devmap_trans_unstable() instead * of pmd_trans_huge() to ensure the pmd didn't become * pmd_trans_huge under us and then back to pmd_none, as a * result of MADV_DONTNEED running immediately after a huge pmd * fault in a different thread of this mm, in turn leading to a * misleading pmd_trans_huge() retval. All we have to ensure is * that it is a regular pmd that we can walk with * pte_offset_map() and we can do that through an atomic read * in C, which is what pmd_trans_unstable() provides. */ if (pmd_devmap_trans_unstable(vmf->pmd)) return 0; /* * A regular pmd is established and it can't morph into a huge * pmd from under us anymore at this point because we hold the * mmap_lock read mode and khugepaged takes it in write mode. * So now it's safe to run pte_offset_map(). */ vmf->pte = pte_offset_map(vmf->pmd, vmf->address); vmf->orig_pte = *vmf->pte; vmf->flags |= FAULT_FLAG_ORIG_PTE_VALID; /* * some architectures can have larger ptes than wordsize, * e.g.ppc44x-defconfig has CONFIG_PTE_64BIT=y and * CONFIG_32BIT=y, so READ_ONCE cannot guarantee atomic * accesses. The code below just needs a consistent view * for the ifs and we later double check anyway with the * ptl lock held. So here a barrier will do. */ barrier(); if (pte_none(vmf->orig_pte)) { pte_unmap(vmf->pte); vmf->pte = NULL; } } // 继续处理第一种问题(此时pte为NULL) if (!vmf->pte) { if (vma_is_anonymous(vmf->vma)) return do_anonymous_page(vmf); else /* 非匿名映射,内部根据不同情况进行处理 1. 读操作异常:do_read_fault 2. 写MAP_PRIVATE映射的内存:do_cow_fault 3. 写MAP_SHARED映射的内存:do_shared_fault 总之最终都会回调vma->vm_ops->fault得到一页内存,再用finish_fault更新页表 这里do_cow_fault会申请到一页新的物理内存(vmf->cow_page),初始内容是从之前的页vmf->page拷贝过来的 */ return do_fault(vmf); } // 处理第二种情况,加载交换出去的内存 if (!pte_present(vmf->orig_pte)) return do_swap_page(vmf); if (pte_protnone(vmf->orig_pte) && vma_is_accessible(vmf->vma)) return do_numa_page(vmf); vmf->ptl = pte_lockptr(vmf->vma->vm_mm, vmf->pmd); spin_lock(vmf->ptl); entry = vmf->orig_pte; if (unlikely(!pte_same(*vmf->pte, entry))) { update_mmu_tlb(vmf->vma, vmf->address, vmf->pte); goto unlock; } // 处理第三种情况,写操作异常,没有写权限 // 注意区分,上面是pte为NULL的流程,而这里pte是存在的。但是pte中缺少写权限,而禁止了这次访问。 // PROT_WRITE且MAP_SHARED,调用相关函数修改权限为可写 // PROT_WRITE且MAP_PRIVATE,是COW,申请新的物理内存,复制内容,更新页表 if (vmf->flags & (FAULT_FLAG_WRITE|FAULT_FLAG_UNSHARE)) { if (!pte_write(entry)) return do_wp_page(vmf); else if (likely(vmf->flags & FAULT_FLAG_WRITE)) entry = pte_mkdirty(entry); } entry = pte_mkyoung(entry); if (ptep_set_access_flags(vmf->vma, vmf->address, vmf->pte, entry, vmf->flags & FAULT_FLAG_WRITE)) { update_mmu_cache(vmf->vma, vmf->address, vmf->pte); } else { /* Skip spurious TLB flush for retried page fault */ if (vmf->flags & FAULT_FLAG_TRIED) goto unlock; /* * This is needed only for protection faults but the arch code * is not yet telling us if this is a protection fault or not. * This still avoids useless tlb flushes for .text page faults * with threads. */ if (vmf->flags & FAULT_FLAG_WRITE) flush_tlb_fix_spurious_fault(vmf->vma, vmf->address); } unlock: pte_unmap_unlock(vmf->pte, vmf->ptl); return 0; }COW有一个非常经典的应用场景:fork子进程。因为子进程需要继承父进程的很多信息,这部分信息复制实际上由
dup_mmap完成。在复制的过程中,主要就是在做COW。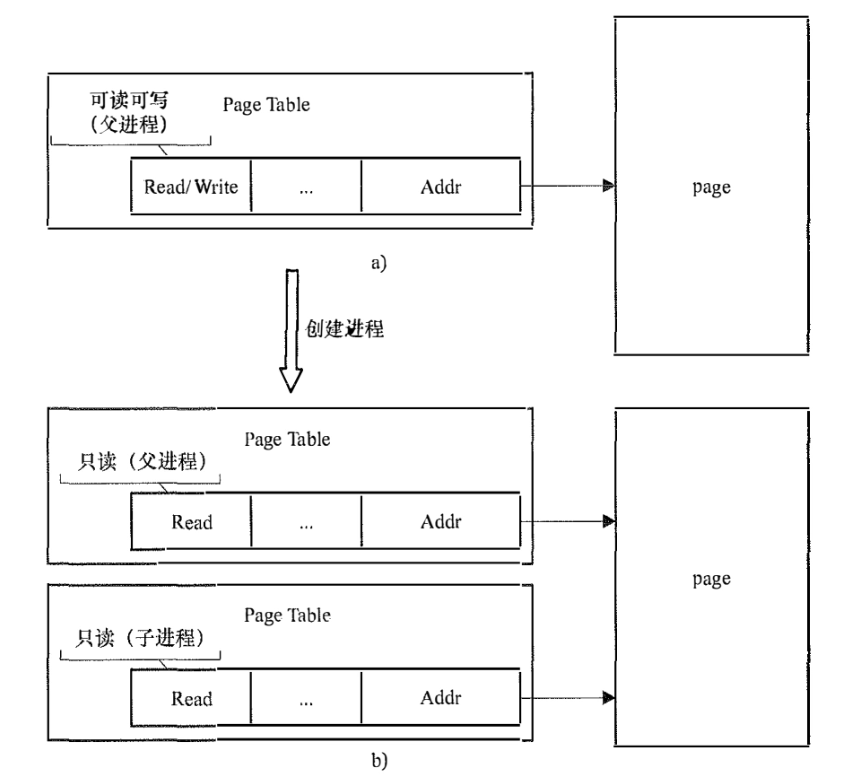
为了保证COW的效果,实际上父子进程的pte项中的权限都会降级。仔细想想这里其实会有一个问题。就是如果父进程此时想写这里的内存,那么COW的优化意义实际上就失效了,父进程必须复制这段内存(因为父进程要修改了),即使后面并子进程不需要写,这其实可能出现浪费。所以子进程先执行COW更合理。而且如果子进程执行新的程序,那么很多内存都不需要复制,出于这个考虑,内核有一个变量来控制子进程是否可以抢占父进程。
内存回收
前文在伙伴系统的讲解中,忽略了内存回收这个大问题。这个问题主要由_alloc_pages_slowpath完成。
进行回收时可能有几种情况:
- 空闲内存足够,但是碎片过多,没有连续内存。这是需要移动并合并一些内存碎片,进行规整(
compact)。 - 空闲内存不足,需要释放一些已经被占用的内存,就是回收(
reclaim)。典型的例子是mmap的内存,如果释放的话,就写回swap(匿名映射),或者写回文件(非匿名映射)
扫描是回收的第一步。扫描过程由scan_control结构体控制。其内容如下
// code from kernel 6.2
struct scan_control {
	/* How many pages shrink_list() should reclaim */
	unsigned long nr_to_reclaim;

	/*
	 * Nodemask of nodes allowed by the caller. If NULL, all nodes
	 * are scanned.
	 */
	nodemask_t	*nodemask;

	/*
	 * The memory cgroup that hit its limit and as a result is the
	 * primary target of this reclaim invocation.
	 */
	struct mem_cgroup *target_mem_cgroup;

	/*
	 * Scan pressure balancing between anon and file LRUs
	 */
	unsigned long	anon_cost;
	unsigned long	file_cost;

	/* Can active folios be deactivated as part of reclaim? */
#define DEACTIVATE_ANON 1
#define DEACTIVATE_FILE 2
	unsigned int may_deactivate:2;
	unsigned int force_deactivate:1;
	unsigned int skipped_deactivate:1;

	/* Writepage batching in laptop mode; RECLAIM_WRITE */
	unsigned int may_writepage:1;

	/* Can mapped folios be reclaimed? */
	unsigned int may_unmap:1;

	/* Can folios be swapped as part of reclaim? */
	unsigned int may_swap:1;

	/* Proactive reclaim invoked by userspace through memory.reclaim */
	unsigned int proactive:1;

	/*
	 * Cgroup memory below memory.low is protected as long as we
	 * don't threaten to OOM. If any cgroup is reclaimed at
	 * reduced force or passed over entirely due to its memory.low
	 * setting (memcg_low_skipped), and nothing is reclaimed as a
	 * result, then go back for one more cycle that reclaims the protected
	 * memory (memcg_low_reclaim) to avert OOM.
	 */
	unsigned int memcg_low_reclaim:1;
	unsigned int memcg_low_skipped:1;

	unsigned int hibernation_mode:1;

	/* One of the zones is ready for compaction */
	unsigned int compaction_ready:1;

	/* There is easily reclaimable cold cache in the current node */
	unsigned int cache_trim_mode:1;

	/* The file folios on the current node are dangerously low */
	unsigned int file_is_tiny:1;

	/* Always discard instead of demoting to lower tier memory */
	unsigned int no_demotion:1;

#ifdef CONFIG_LRU_GEN
	/* help kswapd make better choices among multiple memcgs */
	unsigned int memcgs_need_aging:1;
	unsigned long last_reclaimed;
#endif

	/* Allocation order */
	s8 order;

	/* Scan (total_size >> priority) pages at once */
    // 补充:就是说priority是右移参数,越小的话,扫描的页数越多
	s8 priority;

	/* The highest zone to isolate folios for reclaim from */
	s8 reclaim_idx;

	/* This context's GFP mask */
	gfp_t gfp_mask;

	/* Incremented by the number of inactive pages that were scanned */
	unsigned long nr_scanned;

	/* Number of pages freed so far during a call to shrink_zones() */
	unsigned long nr_reclaimed;

	struct {
		unsigned int dirty;
		unsigned int unqueued_dirty;
		unsigned int congested;
		unsigned int writeback;
		unsigned int immediate;
		unsigned int file_taken;
		unsigned int taken;
	} nr;

	/* for recording the reclaimed slab by now */
	struct reclaim_state reclaim_state;
};
从结构体中可以看到。包含了需要回收的页数,已扫描的页数、已回收的页数等等信息。具体的回收函数shrink_zones是在一个循环中进行的,在某次调用后,可能出现的情况有:
- 当已回收的页数大于需要回收的页数,函数成功退出
- 已回收的页数不够,增加下次扫描的页数
- 如果扫描页数最大化还是找不到足够的内存。可尝试不跳过active的页(默认跳过)再试一下。还不行就只能返回失败了
而这个回收函数,老内核调用shrink_zones,内部再调用shrink_node。高版本直接调用后者,也就是直接以node为单位了。可扫描的页都存储在一个LRU list上。不同版本中所在的位置页不同,老版本在zone中(zone.lruvec),新版本在pglist_data.__lruvec
lruvec实际上是一个链表数组,里面每一个元素都是一个链表,链表元素也就是一系列被扫描的页。链表的类型有多种:匿名页链表、文件页链表。并且还分为活跃、非活跃(最近一段时间是否被访问),每个链表内部还是按照LRU处理的。这些lru上的页都是内核申请的页。应用、驱动都不感知这些页的信息,只是能够使用而已,因此回收过程,实际上我们只要保证下一次再访问时内容正确,将他们暂时从物理内存移除是完全ok的。
不过当然,不是所有内存都可以放到lru链表中。比如在驱动中使用alloc_pages申请内存,驱动在使用完成后将他们释放掉(free_pages)。虽然这些内存还是buddy系统分配的,但是这些内存的生命周期由模块本身负责,内核并不能直接回收这部分。但是内核也为模块留了一个口子,就是shrinker,如果模块实现了回收方法,并注册到内核,在回收时,也会尝试由模块释放一些内存。
shrink_lruvec的逻辑比较清晰:
- 计算各类LRU需要扫描的页数
- 循环调用
shrink_list,每次尝试一种类型的LRU链表
// code from kernel 6.2
static void shrink_lruvec(struct lruvec *lruvec, struct scan_control *sc)
{
	unsigned long nr[NR_LRU_LISTS];
	unsigned long targets[NR_LRU_LISTS];
	unsigned long nr_to_scan;
	enum lru_list lru;
	unsigned long nr_reclaimed = 0;
	unsigned long nr_to_reclaim = sc->nr_to_reclaim;
	bool proportional_reclaim;
	struct blk_plug plug;

	if (lru_gen_enabled()) {
		lru_gen_shrink_lruvec(lruvec, sc);
		return;
	}

    // 计算各类LRU扫描数量
	get_scan_count(lruvec, sc, nr);

	/* Record the original scan target for proportional adjustments later */
	memcpy(targets, nr, sizeof(nr));

	/*
	 * Global reclaiming within direct reclaim at DEF_PRIORITY is a normal
	 * event that can occur when there is little memory pressure e.g.
	 * multiple streaming readers/writers. Hence, we do not abort scanning
	 * when the requested number of pages are reclaimed when scanning at
	 * DEF_PRIORITY on the assumption that the fact we are direct
	 * reclaiming implies that kswapd is not keeping up and it is best to
	 * do a batch of work at once. For memcg reclaim one check is made to
	 * abort proportional reclaim if either the file or anon lru has already
	 * dropped to zero at the first pass.
	 */
	proportional_reclaim = (!cgroup_reclaim(sc) && !current_is_kswapd() &&
				sc->priority == DEF_PRIORITY);

	blk_start_plug(&plug);
	while (nr[LRU_INACTIVE_ANON] || nr[LRU_ACTIVE_FILE] ||
					nr[LRU_INACTIVE_FILE]) {
		unsigned long nr_anon, nr_file, percentage;
		unsigned long nr_scanned;

        // 遍历每一种lru
		for_each_evictable_lru(lru) {
			if (nr[lru]) {
				nr_to_scan = min(nr[lru], SWAP_CLUSTER_MAX);
				nr[lru] -= nr_to_scan;

                // shink_list内有对inactive、active的分别回收
				nr_reclaimed += shrink_list(lru, nr_to_scan,
							    lruvec, sc);
			}
		}

		cond_resched();

		if (nr_reclaimed < nr_to_reclaim || proportional_reclaim)
			continue;

		/*
		 * For kswapd and memcg, reclaim at least the number of pages
		 * requested. Ensure that the anon and file LRUs are scanned
		 * proportionally what was requested by get_scan_count(). We
		 * stop reclaiming one LRU and reduce the amount scanning
		 * proportional to the original scan target.
		 */
		nr_file = nr[LRU_INACTIVE_FILE] + nr[LRU_ACTIVE_FILE];
		nr_anon = nr[LRU_INACTIVE_ANON] + nr[LRU_ACTIVE_ANON];

		/*
		 * It's just vindictive to attack the larger once the smaller
		 * has gone to zero.  And given the way we stop scanning the
		 * smaller below, this makes sure that we only make one nudge
		 * towards proportionality once we've got nr_to_reclaim.
		 */
		if (!nr_file || !nr_anon)
			break;

		if (nr_file > nr_anon) {
			unsigned long scan_target = targets[LRU_INACTIVE_ANON] +
						targets[LRU_ACTIVE_ANON] + 1;
			lru = LRU_BASE;
			percentage = nr_anon * 100 / scan_target;
		} else {
			unsigned long scan_target = targets[LRU_INACTIVE_FILE] +
						targets[LRU_ACTIVE_FILE] + 1;
			lru = LRU_FILE;
			percentage = nr_file * 100 / scan_target;
		}

		/* Stop scanning the smaller of the LRU */
		nr[lru] = 0;
		nr[lru + LRU_ACTIVE] = 0;

		/*
		 * Recalculate the other LRU scan count based on its original
		 * scan target and the percentage scanning already complete
		 */
		lru = (lru == LRU_FILE) ? LRU_BASE : LRU_FILE;
		nr_scanned = targets[lru] - nr[lru];
		nr[lru] = targets[lru] * (100 - percentage) / 100;
		nr[lru] -= min(nr[lru], nr_scanned);

		lru += LRU_ACTIVE;
		nr_scanned = targets[lru] - nr[lru];
		nr[lru] = targets[lru] * (100 - percentage) / 100;
		nr[lru] -= min(nr[lru], nr_scanned);
	}
	blk_finish_plug(&plug);
	sc->nr_reclaimed += nr_reclaimed;

	/*
	 * Even if we did not try to evict anon pages at all, we want to
	 * rebalance the anon lru active/inactive ratio.
	 */
	if (can_age_anon_pages(lruvec_pgdat(lruvec), sc) &&
	    inactive_is_low(lruvec, LRU_INACTIVE_ANON))
		shrink_active_list(SWAP_CLUSTER_MAX, lruvec,
				   sc, LRU_ACTIVE_ANON);
}
LRU链表的一些添加和移除的细节情况。
- 访问页时,会导致active和inactive链表之箭的移动。为了优化,这个移动操作被批量化了,保存在LRU cache中。在扫描inactive list之前,
lru_add_drain必须将这部分排空,加入到对应的LRU链表中,避免漏扫。 - 页隔离,
isolate_lru_folios/isolate_lru_pages用来将待扫描的页从所在的LRU list中删除,并加入到folio_list链表,这样接下来就不回被重复扫描了。当然也就能避免重复回收。
性能思考:为什么隔离采用了删除的方式,而不是添加标记之类的方式。其实可以认为,删除的方式,锁的粒度很小,而且失败了的线程可以直接跳过,去隔离其他的页。另外,将待扫描的页统一到folio_list中,后续批量处理速度更快。
folio(英文原意,对开本)看起来是一个突然出现的概念。但其实一定程度上就是复合页(compound pages),比如某些情况下一个folio中包括的页数是2的整数次幂。注意folio这个概念是在逐渐取代page。但目前内核中仍然会同时存在:page、Compound page(复合页)、folio。folio和page大部分字段都是一致的。所以在高版本中,会用isolate_lru_folios,其实是在向folios做迁移。
隔离到了足够多的页之后,就可以开始回收了。shrink_folio_list在500行左右(有不少的注释),这里不再贴代码,可以直接点击链接。这里直接总结一下书中整理的10个步骤,也就是在循环中执行:
- 从folio_list(隔离出来的页的列表)中取下一个folio
- 如果folio正在写回,等待其写完(对应第6步),并重新插入folio_list尾部,下次继续循环处理
- 检查folio的活跃程度。active/inactive维度,是由上次扫描到现在,访问了物理页的映射的数量来决定(也就是访问了的pte的数量,而不是访问的数量),使用这个数据是因为MMU硬件上是在PTE中提供一个Accessed(A)访问标记,而不是访问次数。referenced/unreferenced维度,只要有一个PTE带有Accessed标记,就是referenced
- 开始尝试回收。如果可以被swap出去,则开始准备。
- 尝试取消folio之前的映射。取消成功后,folio原有的虚拟地址到物理页的映射就无效了。需要从物理地址反向遍历所有相关的PTE,并将它们设置为无效。
- 处理有dirty标记的情况。也就是需要将数据写回(对应第2步)。
- 现在folio已经完全准备好回收,插入free_folios
- 处理回收没有成功,且变为active的folio。
- 将上一步中的folio重新插回folio_list,之后会被返回。
收尾工作,再之前的结尾处会发现,在函数返回时,folio_list中有一些folio实际上回收失败了。但是情况可能有好几种
- 回收失败(比如正在写回等,反正是回收的几步操作失败了),将会被重新放回inactive_lru
- 有过访问,需要重新放回inactive lru
- 访问活跃,要被提升为active,将要被插入active lru
以上的扫描将会进行多次,按顺序分别是先匿名页,后文件页。并且每一种内部是先inactive,后active。当然不同的种类,循环中的步骤会有所差别,比如:active类型的folio不回直接被回收,最多被降级为inactive,因此没有回收的几个步骤。
反向映射
上面忽略了一个问题,就是从一个页面(folio/page),如何获得映射这个页面的PTE。低版本内核将所有映射到某一个页面的PTE维护为一个链表,这样显然非常浪费。一个更合理的方式就是利用已有字段,folio->mapping/page->mapping。这里还要分为匿名和文件两种情况。这里我们还是贴一下folio的代码吧。
/**
 * struct folio - Represents a contiguous set of bytes.
 * @flags: Identical to the page flags.
 * @lru: Least Recently Used list; tracks how recently this folio was used.
 * @mlock_count: Number of times this folio has been pinned by mlock().
 * @mapping: The file this page belongs to, or refers to the anon_vma for
 *    anonymous memory.
 * @index: Offset within the file, in units of pages.  For anonymous memory,
 *    this is the index from the beginning of the mmap.
 * @private: Filesystem per-folio data (see folio_attach_private()).
 *    Used for swp_entry_t if folio_test_swapcache().
 * @_mapcount: Do not access this member directly.  Use folio_mapcount() to
 *    find out how many times this folio is mapped by userspace.
 * @_refcount: Do not access this member directly.  Use folio_ref_count()
 *    to find how many references there are to this folio.
 * @memcg_data: Memory Control Group data.
 * @_flags_1: For large folios, additional page flags.
 * @_head_1: Points to the folio.  Do not use.
 * @_folio_dtor: Which destructor to use for this folio.
 * @_folio_order: Do not use directly, call folio_order().
 * @_compound_mapcount: Do not use directly, call folio_entire_mapcount().
 * @_subpages_mapcount: Do not use directly, call folio_mapcount().
 * @_pincount: Do not use directly, call folio_maybe_dma_pinned().
 * @_folio_nr_pages: Do not use directly, call folio_nr_pages().
 * @_flags_2: For alignment.  Do not use.
 * @_head_2: Points to the folio.  Do not use.
 * @_hugetlb_subpool: Do not use directly, use accessor in hugetlb.h.
 * @_hugetlb_cgroup: Do not use directly, use accessor in hugetlb_cgroup.h.
 * @_hugetlb_cgroup_rsvd: Do not use directly, use accessor in hugetlb_cgroup.h.
 * @_hugetlb_hwpoison: Do not use directly, call raw_hwp_list_head().
 *
 * A folio is a physically, virtually and logically contiguous set
 * of bytes.  It is a power-of-two in size, and it is aligned to that
 * same power-of-two.  It is at least as large as %PAGE_SIZE.  If it is
 * in the page cache, it is at a file offset which is a multiple of that
 * power-of-two.  It may be mapped into userspace at an address which is
 * at an arbitrary page offset, but its kernel virtual address is aligned
 * to its size.
 */
struct folio {
	/* private: don't document the anon union */
	union {
		struct {
	/* public: */
			unsigned long flags;
			union {
				struct list_head lru;
	/* private: avoid cluttering the output */
				struct {
					void *__filler;
	/* public: */
					unsigned int mlock_count;
	/* private: */
				};
	/* public: */
			};
			struct address_space *mapping;
			pgoff_t index;
			void *private;
			atomic_t _mapcount;
			atomic_t _refcount;
#ifdef CONFIG_MEMCG
			unsigned long memcg_data;
#endif
	/* private: the union with struct page is transitional */
		};
		struct page page;
	};
	union {
		struct {
			unsigned long _flags_1;
			unsigned long _head_1;
			unsigned char _folio_dtor;
			unsigned char _folio_order;
			atomic_t _compound_mapcount;
			atomic_t _subpages_mapcount;
			atomic_t _pincount;
#ifdef CONFIG_64BIT
			unsigned int _folio_nr_pages;
#endif
		};
		struct page __page_1;
	};
	union {
		struct {
			unsigned long _flags_2;
			unsigned long _head_2;
			void *_hugetlb_subpool;
			void *_hugetlb_cgroup;
			void *_hugetlb_cgroup_rsvd;
			void *_hugetlb_hwpoison;
		};
		struct page __page_2;
	};
};
-
匿名映射的mapping
在代码注释中也可以看到,匿名映射时,mapping字段是anon_vma地址。通过vma信息,可以得出映射的虚拟地址address,并用来定位PTE。而所有映射到同一个folio的vma,通过
anon_vma_chain数据结构(avc),串联在了一起。自然就可以通过每一个vma拿到所有的虚拟地址address,并定位PTE。如下图所示。当然实际的细节要复杂很多。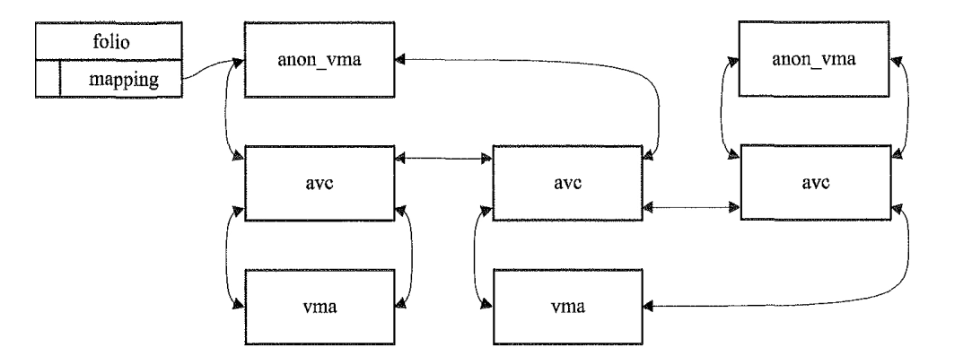
-
文件映射的mapping
文件映射的mapping字段则相对简洁,此时的mapping可以用来直接遍历vma,不需要
anon_vma。
反向映射相关的vma结构,实际由区间树实现(用线性空间地址作为划分),效率还是可以的。更多反向映射的细节可以进一步阅读
rmap_walk_contrl相关的内容。
文件映射的页也可以是匿名页。这一点是针对MAP_ANONYMOUSE|MAP_SHARED的情况,内核会分配一个虚拟文件。这类页写回的时候,只能写回swap分区。
文件系统篇
VFS
先熟悉下几个基本的结构
| 概念 | 数据结构 |
|---|---|
| 文件系统 | super_block |
| 文件本身 | inode |
| 文件的代表 | dentry |
| 文件的内容 | file |
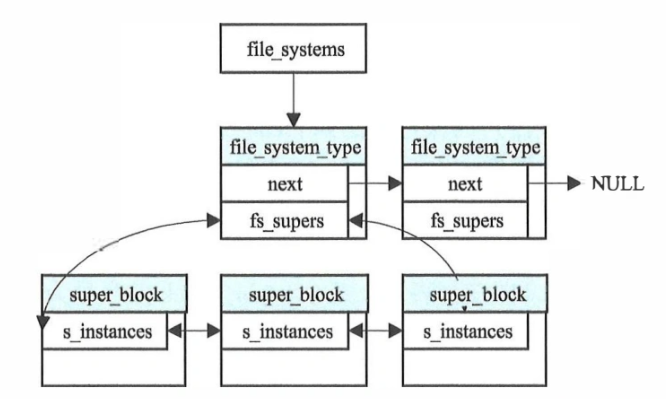
super_block是物理上的文件系统在内存中的抽象。每一块分区格式化完毕的磁盘,都是一个独立的文件系统。super_block按照类型,由file_system_type进行链接管理。
inode在整个文件系统中是核心结构,这里粘贴一下源代码定义。
/*
 * Keep mostly read-only and often accessed (especially for
 * the RCU path lookup and 'stat' data) fields at the beginning
 * of the 'struct inode'
 */
//  inode本身并不存储文件内容,而是存储访问文件内容的方法
struct inode {
    // 文件类型
	umode_t			i_mode;
	unsigned short		i_opflags;
	kuid_t			i_uid;
	kgid_t			i_gid;
	unsigned int		i_flags;

#ifdef CONFIG_FS_POSIX_ACL
	struct posix_acl	*i_acl;
	struct posix_acl	*i_default_acl;
#endif
    // inode支持的操作
	const struct inode_operations	*i_op;
    // sb这个缩写都是指super block
	struct super_block	*i_sb;
	struct address_space	*i_mapping;

#ifdef CONFIG_SECURITY
	void			*i_security;
#endif

	/* Stat data, not accessed from path walking */
    // inode 序号,在同一个文件系统中,应该是唯一的
    // 内核会维护一组哈希链表,每个inode所在的哈希链表,是hash(super_block,i_ino)一起算出来的
    // 注意因为整个系统范围内inode可能重复,所以hash需要加上代表对应文件系统的超级块
    // 内核中的这组哈希链表是inode_hashtable
	unsigned long		i_ino;
	/*
	 * Filesystems may only read i_nlink directly.  They shall use the
	 * following functions for modification:
	 *
	 *    (set|clear|inc|drop)_nlink
	 *    inode_(inc|dec)_link_count
	 */
	union {
		const unsigned int i_nlink;
		unsigned int __i_nlink;
	};
	dev_t			i_rdev;
	loff_t			i_size;
    // access、modify、change时间
	struct timespec64	i_atime;
	struct timespec64	i_mtime;
	struct timespec64	i_ctime;
	spinlock_t		i_lock;	/* i_blocks, i_bytes, maybe i_size */
	unsigned short          i_bytes;
	u8			i_blkbits;
	u8			i_write_hint;
	blkcnt_t		i_blocks;

#ifdef __NEED_I_SIZE_ORDERED
	seqcount_t		i_size_seqcount;
#endif

	/* Misc */
	unsigned long		i_state;
	struct rw_semaphore	i_rwsem;

	unsigned long		dirtied_when;	/* jiffies of first dirtying */
	unsigned long		dirtied_time_when;

    // 链接到hash表中
	struct hlist_node	i_hash;
	struct list_head	i_io_list;	/* backing dev IO list */
#ifdef CONFIG_CGROUP_WRITEBACK
	struct bdi_writeback	*i_wb;		/* the associated cgroup wb */

	/* foreign inode detection, see wbc_detach_inode() */
	int			i_wb_frn_winner;
	u16			i_wb_frn_avg_time;
	u16			i_wb_frn_history;
#endif
	struct list_head	i_lru;		/* inode LRU list */

    // 链接到super block的链表中
	struct list_head	i_sb_list;
	struct list_head	i_wb_list;	/* backing dev writeback list */
	union {
        // 文件的硬链接的dentry组成的链表的链表头
		struct hlist_head	i_dentry;
		struct rcu_head		i_rcu;
	};
	atomic64_t		i_version;
	atomic64_t		i_sequence; /* see futex */
	atomic_t		i_count;
	atomic_t		i_dio_count;
	atomic_t		i_writecount;
#if defined(CONFIG_IMA) || defined(CONFIG_FILE_LOCKING)
	atomic_t		i_readcount; /* struct files open RO */
#endif
	union {
        // 文件内容相关操作,注意和i_op的区别
		const struct file_operations	*i_fop;	/* former ->i_op->default_file_ops */
		void (*free_inode)(struct inode *);
	};
	struct file_lock_context	*i_flctx;
	struct address_space	i_data;
	struct list_head	i_devices;
	union {
		struct pipe_inode_info	*i_pipe;
		struct cdev		*i_cdev;
        // 链接的目标文件的路径
		char			*i_link;
		unsigned		i_dir_seq;
	};

	__u32			i_generation;

#ifdef CONFIG_FSNOTIFY
	__u32			i_fsnotify_mask; /* all events this inode cares about */
	struct fsnotify_mark_connector __rcu	*i_fsnotify_marks;
#endif

#ifdef CONFIG_FS_ENCRYPTION
	struct fscrypt_info	*i_crypt_info;
#endif

#ifdef CONFIG_FS_VERITY
	struct fsverity_info	*i_verity_info;
#endif

	void			*i_private; /* fs or device private pointer */
} __randomize_layout;
一些关键的内容已经补充了中文注释。另外注意文件系统中,modify指的是更改文件的内容,change指的是文件本身的改动。
dentry用来协助inode,完成文件之间的层级结构的表示。
struct dentry {
	/* RCU lookup touched fields */
	unsigned int d_flags;		/* protected by d_lock */
	seqcount_spinlock_t d_seq;	/* per dentry seqlock */
	struct hlist_bl_node d_hash;	/* lookup hash list */
	struct dentry *d_parent;	/* parent directory */
	struct qstr d_name;
	struct inode *d_inode;		/* Where the name belongs to - NULL is
					 * negative */

    // 短名字,不够存的话,放到d_name里
	unsigned char d_iname[DNAME_INLINE_LEN];	/* small names */

	/* Ref lookup also touches following */
	struct lockref d_lockref;	/* per-dentry lock and refcount */
	const struct dentry_operations *d_op;
	struct super_block *d_sb;	/* The root of the dentry tree */
	unsigned long d_time;		/* used by d_revalidate */
	void *d_fsdata;			/* fs-specific data */

	union {
		struct list_head d_lru;		/* LRU list */
		wait_queue_head_t *d_wait;	/* in-lookup ones only */
	};
	struct list_head d_child;	/* child of parent list */
	struct list_head d_subdirs;	/* our children */
	/*
	 * d_alias and d_rcu can share memory
	 */
	union {
		struct hlist_node d_alias;	/* inode alias list */
		struct hlist_bl_node d_in_lookup_hash;	/* only for in-lookup ones */
	 	struct rcu_head d_rcu;
	} d_u;
} __randomize_layout;
观察inode结构体可以发现,其实inode本身是不能表示文件间的关系,也就是文件、目录之间的层级关系。层级关系需要dentry协助解决这个问题。也就是说文件系统有两套层级结构,一套是文件系统内部自行维护,另一套是dentry维护。dentry是完全存在于内存的结构。
这里就可以复习一下,软链接和硬链接的区别。有了dentry,就可以遍历父目录、子目录。当然也会有效率更高的,内核维护的dentry_hashtable来查找的方式。但是dentry并不是一开始就有的,是在访问目录的过程中不断创建出来的,也就是说,实际上我们仍然是在访问inode,从inode中得知文件系统的层级结构。并将其存储到dentry里。因此上面我们说,dentry是协助inode维护目录信息的。硬链接是多了一个dentry,软链接则是多了一个文件。
最后我们来看一下文件file
struct file {
	union {
		struct llist_node	f_llist;
		struct rcu_head 	f_rcuhead;
		unsigned int 		f_iocb_flags;
	};
	struct path		f_path;
    // 所属的inode
	struct inode		*f_inode;	/* cached value */
    // 文件操作
	const struct file_operations	*f_op;

	/*
	 * Protects f_ep, f_flags.
	 * Must not be taken from IRQ context.
	 */
	spinlock_t		f_lock;
    // 引用计数
	atomic_long_t		f_count;
	unsigned int 		f_flags;
	fmode_t			f_mode;
	struct mutex		f_pos_lock;
    // 当前位置
	loff_t			f_pos;
	struct fown_struct	f_owner;
	const struct cred	*f_cred;
	struct file_ra_state	f_ra;

	u64			f_version;
#ifdef CONFIG_SECURITY
	void			*f_security;
#endif
	/* needed for tty driver, and maybe others */
	void			*private_data;

#ifdef CONFIG_EPOLL
	/* Used by fs/eventpoll.c to link all the hooks to this file */
	struct hlist_head	*f_ep;
#endif /* #ifdef CONFIG_EPOLL */
	struct address_space	*f_mapping;
	errseq_t		f_wb_err;
	errseq_t		f_sb_err; /* for syncfs */
} __randomize_layout
  __attribute__((aligned(4)));	/* lest something weird decides that 2 is OK */
超级块super_block的内容稍微有些多,这里放一下链接可以自行查看。
一个文件系统的实现,最核心的点就是下面几个部分:挂载、查找、操作、I/O
文件系统的挂载
文件系统可以分为三类:基于磁盘的、基于内存的、网络文件系统。但从设计上可以则将他们分为:虚拟文件系统VFS,和挂载到VFS的实际上的文件系统(比如ext4、sysfs等)。
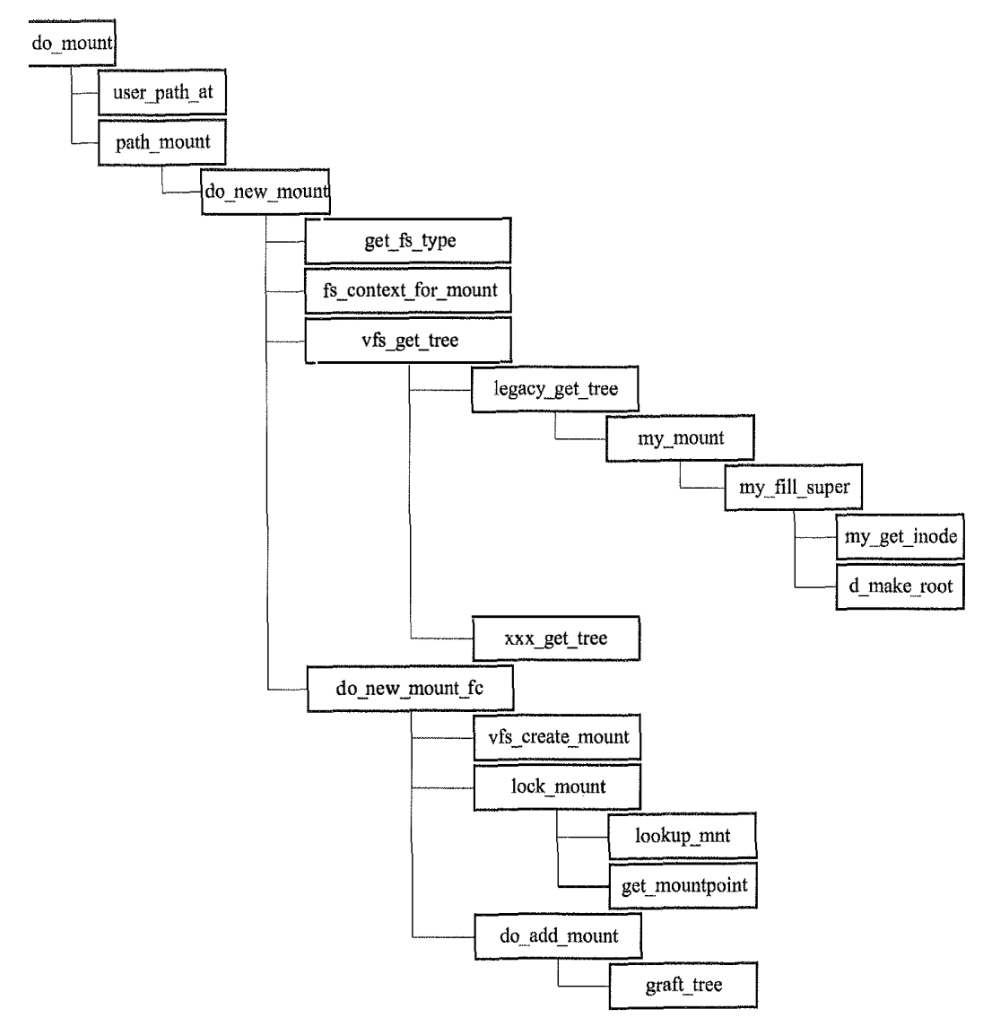
挂载的调用关系如下图所示(do_mount是系统调用最终的工作函数)
这里的my_,或者xx_都是一种代指,是书中给出的一种实现的模板,因为文件系统众多,实际上的实现因文件系统而异。感兴趣的话,可以去看例如
ext4_fill_super这些。
如果是新挂载一个文件系统。那么do_new_mount中需要经过的步骤主要是
- 根据fstype找到对应的file_system_type
- 初始化
fs_context,后续简称为fc。初始化操作由file_system_type->init_fs_context完成。主要是要定义fc->ops,也就是文件系统的一些操作。 vfs_get_tree回调fc->ops->get_tree。获取文件结构树。最终获取到了这个文件操作系统对应的super_block(当然如果没有的话会创建一个super_block)。超级块里面的s_root,也就是dentry类型指针,对应的文件系统的root文件,名字一般就是我们熟悉的/。- 这一步流程内部,在已建立super_block之后,是由对应的文件系统提供获取文件的inode的方式
xx_get_inode,这里的inode是由该文件系统内部查询或者创建出来的。
- 这一步流程内部,在已建立super_block之后,是由对应的文件系统提供获取文件的inode的方式
do_new_mount_fc,根据得到的超级块和root文件为mount结构体赋值。- 调用
lock_mount找到/创建对应的mountpoint挂载点。调用do_add_mount & graft_tree完成挂载关系。为了方便查找子mount,在哈希链表中,子mount的下标,是用父mount的信息计算的。
- 调用
这里有几个要点值得理解一下:
- super_block的创建是看需求的,如果之前已有的super_block不能满足当前的新的mount的需求,就会创建一个,比如文件系统类型不同、mount参数冲突等。
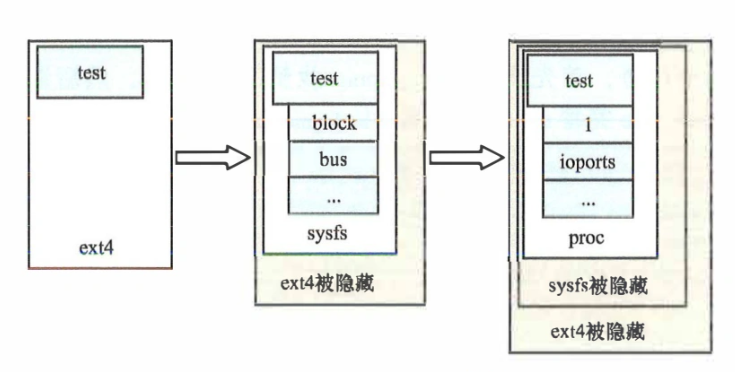
- 一个路径可以被挂载多次,后挂载的文件系统将会覆盖之前挂载到这个路径的文件系统,
unmount之后又会恢复。书上的比喻是:一层一层穿过所有的墙(递归检查指定路径上的挂载),在最后一面墙的后面再起新墙(本次的挂载,覆盖了前面的所有挂载)。子mount会覆盖父mount。 - 继续第2点。路径解析是自顶向下。但挂载点查找是自底向上的,即给定一个路径,查找最深的覆盖他的mount(mountpoint lookup)。从另一个角度理解,就是mnt_mountpoint 不是“挂载的目标路径”,而是“在父文件系统中被覆盖的目录”
下图是路径/test被先后挂载ext4、sysfs、proc文件系统之后的状态。
mount和、vfsmount结构体如下。一些书中重点已单独备注
struct mount {
    // 将当前mount对象链接到hash链表
	struct hlist_node mnt_hash;
    // 父mount,因为挂载是可以嵌套的,所以需要有这个
	struct mount *mnt_parent;
    // 挂载点
	struct dentry *mnt_mountpoint;
    // 内嵌vfsmount
	struct vfsmount mnt;
	union {
		struct rcu_head mnt_rcu;
		struct llist_node mnt_llist;
	};
#ifdef CONFIG_SMP
	struct mnt_pcp __percpu *mnt_pcp;
#else
	int mnt_count;
	int mnt_writers;
#endif
    // 子mount也保存了
	struct list_head mnt_mounts;	/* list of children, anchored here */
	struct list_head mnt_child;	/* and going through their mnt_child */
    // 将当前对象链接到超级块的链表中
	struct list_head mnt_instance;	/* mount instance on sb->s_mounts */
	const char *mnt_devname;	/* Name of device e.g. /dev/dsk/hda1 */
	struct list_head mnt_list;
	struct list_head mnt_expire;	/* link in fs-specific expiry list */
	struct list_head mnt_share;	/* circular list of shared mounts */
	struct list_head mnt_slave_list;/* list of slave mounts */
	struct list_head mnt_slave;	/* slave list entry */
	struct mount *mnt_master;	/* slave is on master->mnt_slave_list */
	struct mnt_namespace *mnt_ns;	/* containing namespace */
	struct mountpoint *mnt_mp;	/* where is it mounted */
	union {
		struct hlist_node mnt_mp_list;	/* list mounts with the same mountpoint */
		struct hlist_node mnt_umount;
	};
	struct list_head mnt_umounting; /* list entry for umount propagation */
#ifdef CONFIG_FSNOTIFY
	struct fsnotify_mark_connector __rcu *mnt_fsnotify_marks;
	__u32 mnt_fsnotify_mask;
#endif
	int mnt_id;			/* mount identifier */
	int mnt_group_id;		/* peer group identifier */
	int mnt_expiry_mark;		/* true if marked for expiry */
	struct hlist_head mnt_pins;
	struct hlist_head mnt_stuck_children;
} __randomize_layout;

struct vfsmount {
    // 前文说的xx_get_tree所返回的根dentry
	struct dentry *mnt_root;	/* root of the mounted tree */
    // 同样是xx_get_tree返回的超级块
	struct super_block *mnt_sb;	/* pointer to superblock */
	int mnt_flags;
	struct mnt_idmap *mnt_idmap;
} __randomize_layout;
文件查找
查找路径有共同的流程:设置起点,查找中间路径,处理目标文件/路径。过程中用到的,metaidata是存储查找阶段配置的结构体。nameidata是每一轮查找的一个辅助结构(主要包含本轮找到的path、dentry、文件类型)。
- 设置起点
path_init:起点在metaidata->dfd中表示(int值类型,值是AT_FDCWD当前目录的意思,或者是一个文件描述符fd)。分别处理相对路径和绝对路径,设置起点和对应的inode(nd->path.dentry->d_inode) - 查询中间路径
link_path_walk:循环查找,以/为分割。注意我们之前讲过dentry是在使用过程中一点一点建立的,所以查找过程中,lookup_fast是查找已有的dentry中是否有我们要的,但是没有的话,还是需要调用lookup_slow,深入到从文件系统中查找。- 查找dentry的过程中,找到的dentry并不一定能直接使用,前面我们讲过的挂载,拿到的dentry有可能已经被子挂载覆盖隐藏了。因此查找dentry还需要“穿墙”。
- 另外还要处理符号链接,如果文件是符号链接,改为返回链接的路径,将剩余路径拼到链接路径后面,继续处理
- 处理目标文件、路径
path_lookupat
lookup的调用流程
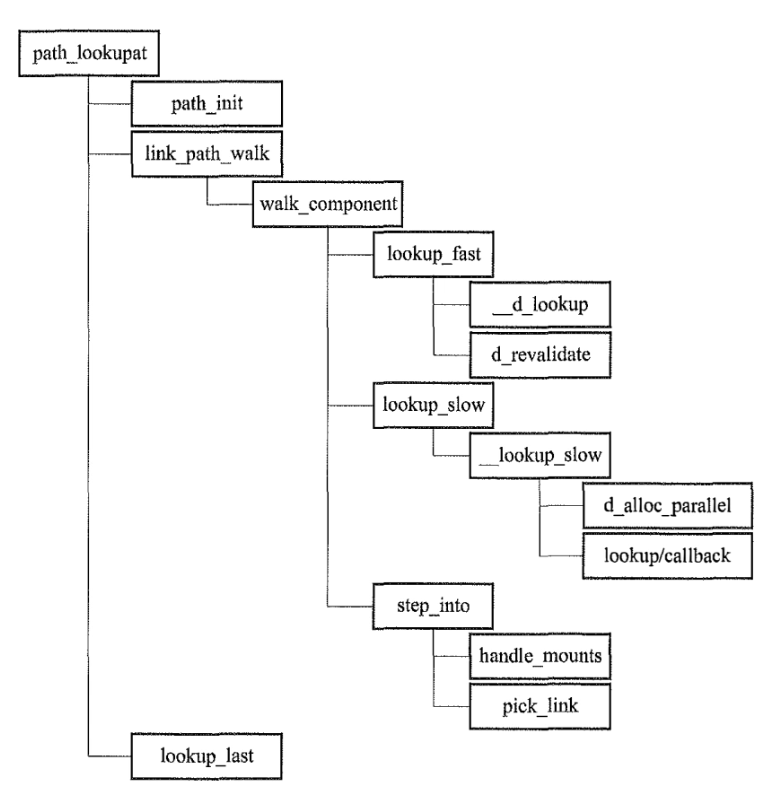
lookup的fast和slow的区别,一边是用dentry,一边是用inode->i_op->lookup深入文件系统查找
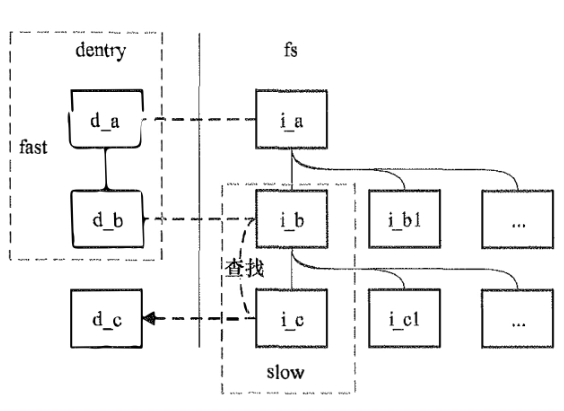
从上文的挂载中我们可以知道,挂载时会返回被挂载的文件系统的根'/‘文件所对应的dentry。而更多的dentry,则是在查找过程中创建。
- 创建根dentry的过程。挂载时的
d_make_root、d_alloc_anon、d_instantiate。用super_block和根inode来完成初始化。内核是通过iget_locked入口来获取inode的(如果inode不存在,则最终可能需要文件系统提供s_op.alloc_inode回调函数创建) - 各文件系统的实现不同。单元里类似。目录文件的inode指向的data block,存储着所有的子文件/一级子目录的"dentry"(这里的dentry是文件系统自己定义的结构,比如
ext4_dir_entry_2。这些结构里又存储着inode号,重复这个过程。
也可以看一下ext4文件系统的一些设计,这样能更好的理解文件系统的结构,以及文件系统结构最终如何被抽象为inode + dentry。参考:文件系统专栏 | 之ext4文件系统结构、ext4文件系统内部结构解析
文件操作
文件操作指的是对“文件”本身的操作,而不是对文件内容的操作
实际上无论是什么操作,VFS都是定义框架,具体的实现由各个文件系统决定。
软链接和硬链接
硬链接的系统调用为link/linkat,最终调用do_linkat。软链接则是symlink/symlinkat,最终调用do_symlinkat。
目录的硬链接数比较有趣,inode结构中的i_nlink字段是一个计数,目录,以及目录的.,以及所有的子目录的..都指向该目录,都会使得该值+1。
/*
 * Hardlinks are often used in delicate situations.  We avoid
 * security-related surprises by not following symlinks on the
 * newname.  --KAB
 *
 * We don't follow them on the oldname either to be compatible
 * with linux 2.0, and to avoid hard-linking to directories
 * and other special files.  --ADM
 */
int do_linkat(int olddfd, struct filename *old, int newdfd,
	      struct filename *new, int flags)
{
	struct user_namespace *mnt_userns;
	struct dentry *new_dentry;
	struct path old_path, new_path;
	struct inode *delegated_inode = NULL;
	int how = 0;
	int error;

	if ((flags & ~(AT_SYMLINK_FOLLOW | AT_EMPTY_PATH)) != 0) {
		error = -EINVAL;
		goto out_putnames;
	}
	/*
	 * To use null names we require CAP_DAC_READ_SEARCH
	 * This ensures that not everyone will be able to create
	 * handlink using the passed filedescriptor.
	 */
	if (flags & AT_EMPTY_PATH && !capable(CAP_DAC_READ_SEARCH)) {
		error = -ENOENT;
		goto out_putnames;
	}

	if (flags & AT_SYMLINK_FOLLOW)
		how |= LOOKUP_FOLLOW;
retry:
	error = filename_lookup(olddfd, old, how, &old_path, NULL);
	if (error)
		goto out_putnames;

	new_dentry = filename_create(newdfd, new, &new_path,
					(how & LOOKUP_REVAL));
	error = PTR_ERR(new_dentry);
	if (IS_ERR(new_dentry))
		goto out_putpath;

	error = -EXDEV;
	if (old_path.mnt != new_path.mnt)
		goto out_dput;
	mnt_userns = mnt_user_ns(new_path.mnt);
	error = may_linkat(mnt_userns, &old_path);
	if (unlikely(error))
		goto out_dput;
	error = security_path_link(old_path.dentry, &new_path, new_dentry);
	if (error)
		goto out_dput;
    // new_dentry是新创建的硬链接,old_path.dentry则是已有文件,最终这两个dentry都将指向old_path.dentry->d_inode
	error = vfs_link(old_path.dentry, mnt_userns, new_path.dentry->d_inode,
			 new_dentry, &delegated_inode);
out_dput:
	done_path_create(&new_path, new_dentry);
	if (delegated_inode) {
		error = break_deleg_wait(&delegated_inode);
		if (!error) {
			path_put(&old_path);
			goto retry;
		}
	}
	if (retry_estale(error, how)) {
		path_put(&old_path);
		how |= LOOKUP_REVAL;
		goto retry;
	}
out_putpath:
	path_put(&old_path);
out_putnames:
	putname(old);
	putname(new);

	return error;
}

int do_symlinkat(struct filename *from, int newdfd, struct filename *to)
{
	int error;
	struct dentry *dentry;
	struct path path;
	unsigned int lookup_flags = 0;

	if (IS_ERR(from)) {
		error = PTR_ERR(from);
		goto out_putnames;
	}
retry:
	dentry = filename_create(newdfd, to, &path, lookup_flags);
	error = PTR_ERR(dentry);
	if (IS_ERR(dentry))
		goto out_putnames;

	error = security_path_symlink(&path, dentry, from->name);
	if (!error) {
		struct user_namespace *mnt_userns;

		mnt_userns = mnt_user_ns(path.mnt);
        // path.dentry->d_inode就是符号链接将要存在的父目录的inode
        // 该inode用于判断是否支持符号链接操作,并最终创建一个符号链接文件
        // 并为创建出来的dentry赋值
		error = vfs_symlink(mnt_userns, path.dentry->d_inode, dentry,
				    from->name);
	}
	done_path_create(&path, dentry);
	if (retry_estale(error, lookup_flags)) {
		lookup_flags |= LOOKUP_REVAL;
		goto retry;
	}
out_putnames:
	putname(to);
	putname(from);
	return error;
}
硬链接核心逻辑位于do_link_at函数及vfs_link,底层为inode->i_op->link。一般的实现是,软链接创建一个新的特殊文件(拥有新的inode),但是其内容是链接的目标地址的字符串。而硬链接本质则是同一个inode的多个dentry。而且因此可以知道一些区别:
-
硬链接不能跨文件系统,因为文件系统之间的inode彼此独立。
-
不能给目录创建硬链接。主要的理由是防止路径循环,因为硬链接直接用同一个inode,如果允许目录硬链接,那么实际上破坏了文件系统的DAG结构,这是结构上的设计问题(没有必要为了这个特性,在inode中添加信息来维护)。而软链接能够允许则是因为软链接相当于路径重定向(只是一个alias),而且一般也配置了深度限制。而且常见的还有另一个问题,
../的语义,硬链接在这种情况下也变得模糊,到底是当前目录的上级,还是链接目标目录的上级。另外一个更现实的问题就是,从实现的角度来看,软链接循环发生在
vfs_follow_link,内核可以加以控制。而硬链接目录的循环是静态结构,在应用层访问时也会发生,需要应用自行防御,完全不可靠。
创建和删除目录
linux 并没有区分普通文件和目录。区别在于二者支持的操作不同(inode->i_op)。对于vfs来说,入口是在vfs_mkdir。
创建目录的特殊点在于要判断父目录是否允许创建目录。
删除目录的特殊点在于判断是否允许删除目录,以及删除的目录上是否挂载了文件系统,有挂载时不能删除。
注意创建和删除目录的操作,都是由父目录的inode执行操作。这也符合前面文件查找时的流程,即分为处理中间路径 + 处理尾巴。
打开和关闭文件
打开、关闭文件都要先查找文件。对于vfs来说,入口在vfs_open。
系统最终分配fd,并创建对应的file对象。
文件其实并没有打开、关闭这种说法。其实所谓的打开文件,是指内核完成路径查找,创建fd,创建file,并绑定fd与file,将file返回给用户空间这个过程。后续访问文件,就不需要内核再介入。
关闭文件则相反,就是释放file,回收fd。close过程中,根据需要,依次执行flush、fasync(异步通知)、dput(处理dentry)
创建节点和删除文件
名为创建节点,实际上也是创建文件。入口是mknod函数。
创建时先找到目录,然后创建文件的dentry,最后创建文件,一共支持四种:S_IFREG普通文件、字符设备文件S_IFCHR、块设备文件S_IFBLK、FIFO文件S_IFIFO、Socket文件S_IFSOCK。如果是普通文件,其实在前文的open(打开)过程中也是可以创建的。
后四种文件的创建入口是vfs_mknod。当然需要判断所在目录inode是否支持对应操作inode->i_op->mknod。
删除文件,实际上是系统调用unlink,最后调用vfs_unlink,由文件系统执行操作。删除成功之后,才会进一步删除dentry,以及从系统哈希链表中删除。之所以叫unlink,就是因为这一步删除的就是硬链接,文件系统需要判断硬链接删除之后文件是否还有硬链接。如果没有,就可以真正删除了。
文件IO
每次打开文件,都会创建不同的file对象。文件的读写位置是属于file对象的file->f_pos。不同file对象之间,读写会互相影响。书中有如下例子
int fd1 = open("f.txt", O_RDWR | O_CREATE);
int fd2 = open("f.txt", O_RDWR | O_CREATE);

char buf1[] = "abcdefg";
char buf2[] = "hijkl";
write(fd1, buf1, strlen(buf1));
close(fd1);
write(fd2, buf2, strlen(buf2));
close(fd2);
// 最终结果是"hijklfg"
vfs入口在vfs_read、vfs_write。并要求文件系统至少实现file->f_op->read/read_iter,file->f_op->write/write_iter。旧版中还有aio_xxx。
而其中的xxx_iter,要求可以实现同步、异步读写。底层一般实现为异步,并通过添加wait_xxx的方式支持同步。这里需要再次强调一下。同步/异步,阻塞/非阻塞的区别。
| 阻塞 | 非阻塞 | |
|---|---|---|
| 同步 | read/write | read/write with O_NONBLOCK |
| 异步 | poll/select | aio(新版对用read/write_iter) |
再次确认理解这两个正交的维度:只要read/write就是同步,只不过阻塞要等待数据读出,而非阻塞则可以直接返回(读取长度为0)。反过来异步则是等待数据就绪的信号通知,此时的阻塞和非阻塞则对应等待数据就绪的过程是否是阻塞的。非阻塞就是事件驱动,阻塞则仍然需要调用poll/select轮询等待。
编写read/write_iter时,可以通过内核提供的is_sync_kiocb判断。并区分不同行为。这里出现的iocb,就是i/o control block控制块,控制块作为I/O上下文,包括了I/O必须的信息。
/*
 * we always use a 64bit off_t when communicating
 * with userland.  its up to libraries to do the
 * proper padding and aio_error abstraction
 */

struct iocb {
	/* these are internal to the kernel/libc. */
	__u64	aio_data;	/* data to be returned in event's data */

#if defined(__BYTE_ORDER) ? __BYTE_ORDER == __LITTLE_ENDIAN : defined(__LITTLE_ENDIAN)
	__u32	aio_key;	/* the kernel sets aio_key to the req # */
	__kernel_rwf_t aio_rw_flags;	/* RWF_* flags */
#elif defined(__BYTE_ORDER) ? __BYTE_ORDER == __BIG_ENDIAN : defined(__BIG_ENDIAN)
	__kernel_rwf_t aio_rw_flags;	/* RWF_* flags */
	__u32	aio_key;	/* the kernel sets aio_key to the req # */
#else
#error edit for your odd byteorder.
#endif

	/* common fields */
	__u16	aio_lio_opcode;	/* see IOCB_CMD_ above */
	__s16	aio_reqprio;
	__u32	aio_fildes;

	__u64	aio_buf;
	__u64	aio_nbytes;
	__s64	aio_offset;

	/* extra parameters */
	__u64	aio_reserved2;	/* TODO: use this for a (struct sigevent *) */

	/* flags for the "struct iocb" */
	__u32	aio_flags;

	/*
	 * if the IOCB_FLAG_RESFD flag of "aio_flags" is set, this is an
	 * eventfd to signal AIO readiness to
	 */
	__u32	aio_resfd;
}; /* 64 bytes */
另外对于设备,还有一个ioctl,用来控制设备的io等操作。因为linux将设备也抽象为文件,所以对设备的操作,最终会调用vfs_ioctl,调用file->f_op->unlocked_ioctl。
/proc伪文件系统
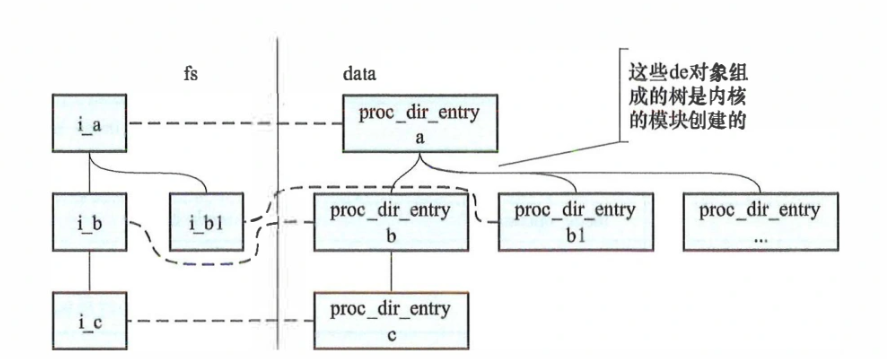
/proc文件系统是基于内存的文件系统,方便用户空间访问内核数据结构,更改内核部分设置。
/proc文件系统定义的最重要的结构体就是proc_dir_entry,可以用来描述目录、普通文件、符号链接。是proc文件系统的核心实现。
/*
 * This is not completely implemented yet. The idea is to
 * create an in-memory tree (like the actual /proc filesystem
 * tree) of these proc_dir_entries, so that we can dynamically
 * add new files to /proc.
 *
 * parent/subdir are used for the directory structure (every /proc file has a
 * parent, but "subdir" is empty for all non-directory entries).
 * subdir_node is used to build the rb tree "subdir" of the parent.
 */
struct proc_dir_entry {
	/*
	 * number of callers into module in progress;
	 * negative -> it's going away RSN
	 */
	atomic_t in_use;
	refcount_t refcnt;
	struct list_head pde_openers;	/* who did ->open, but not ->release */
	/* protects ->pde_openers and all struct pde_opener instances */
	spinlock_t pde_unload_lock;
	struct completion *pde_unload_completion;
    // inode操作,inode_operations定义了所有可能的操作函数指针,但根据需求,只需要赋值需要的部分为proc_iops
	const struct inode_operations *proc_iops;
	union {
		const struct proc_ops *proc_ops;
		const struct file_operations *proc_dir_ops;
	};
	const struct dentry_operations *proc_dops;
	union {
		const struct seq_operations *seq_ops;
		int (*single_show)(struct seq_file *, void *);
	};
	proc_write_t write;
	void *data;
	unsigned int state_size;
    // 文件的inode号
	unsigned int low_ino;
	nlink_t nlink;
	kuid_t uid;
	kgid_t gid;
	loff_t size;
	struct proc_dir_entry *parent;
    // 子proc_dir_entry组成的红黑树
	struct rb_root subdir;
    // 在父节点的红黑树中
	struct rb_node subdir_node;
    // 名字
	char *name;
    // 访问权限控制
	umode_t mode;
	u8 flags;
    // 名字长度
	u8 namelen;
	char inline_name[];
} __randomize_layout;
proc的文件是内核创建的,用户空间只有查看,以及个别文件setattr的能力。
因为proc文件系统内并没有存储真正的inode。所以访问时,VFS侧的inode也是根据访问创建并销毁。
proc文件列表
| 文件 | 作用 |
|---|---|
| /proc/cmdline | 内核启动参数 |
| /proc/interrupts | 系统各种中断信息 |
| /proc/softirqs | 软中断信息 |
| /proc/irq/[num] | 中断信息 |
| /proc/filesystems | 支持的文件系统信息 |
| /proc/mounts | 文件系统挂载信息 |
| /proc/fs/[fs_name] | 文件系统信息 |
| /proc/meminfo | 内存整体信息 |
| /proc/zoneinfo | 内存zone信息 |
| /proc/mtrr | 内存mtrr信息 |
| /proc/[num] | 各进程信息 |
sysfs文件系统
本书在讲解sysfs时,只是侧重了作为文件系统的一些设计。并没有深入讲解Linux的设备模型等。对于相关内容可以自行阅读其他教材。
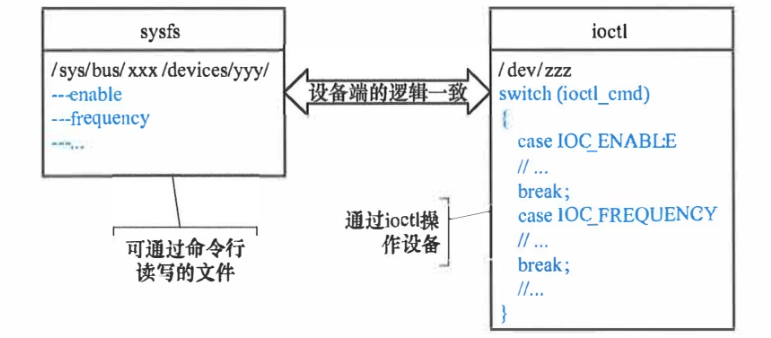
sysfs也是一个基于内存的文件系统,挂载于/sys路径。使用频率很高。sysfs将设备的层级结构反映到用户空间中,用户空间的程序可以读取文件来获取设备的信息和状态。
注意:sysfs的功能和/dev的区别是,sysfs是将设备的设备模型下的各类信息暴露到用户空间,设计上就是面向文件的,读写文件就是操作,而且是可视化的文件内容,所见即所得。而/dev则是在sysfs建立后,响应内核的uevent,去sysfs下读取属性,并将设备抽象为文件,具体分为块设备或者字符设备,可以进一步借助ioctl,打开设备文件进行操作。两者是上下游协同关系,并且在使用效率和易用性上各有优劣。
sysfs一般具有的子目录及其作用
| 子目录 | 作用 |
|---|---|
| block | 块设备 |
| bus | 总线 |
| class | 驱动程序类别 |
| devices | 设备,按层级结构 |
| firmware | 系统固件 |
| fs | 挂载的文件系统信息 |
| kernel | 内核状态 |
| module | 加载的模块 |
| power | 电源管理 |
kernfs
较新的内核中提供kernfs模块,作为一个通用的模块。协助内核的各子系统实现对应的伪文件系统。sysfs、cgroup2文件系统都有使用。
/*
 * kernfs_node - the building block of kernfs hierarchy.  Each and every
 * kernfs node is represented by single kernfs_node.  Most fields are
 * private to kernfs and shouldn't be accessed directly by kernfs users.
 *
 * As long as count reference is held, the kernfs_node itself is
 * accessible.  Dereferencing elem or any other outer entity requires
 * active reference.
 */
struct kernfs_node {
	atomic_t		count;
	atomic_t		active;
#ifdef CONFIG_DEBUG_LOCK_ALLOC
	struct lockdep_map	dep_map;
#endif
	/*
	 * Use kernfs_get_parent() and kernfs_name/path() instead of
	 * accessing the following two fields directly.  If the node is
	 * never moved to a different parent, it is safe to access the
	 * parent directly.
	 */
	struct kernfs_node	*parent;
	const char		*name;

	struct rb_node		rb;

	const void		*ns;	/* namespace tag */
	unsigned int		hash;	/* ns + name hash */
	union {
		struct kernfs_elem_dir		dir;
		struct kernfs_elem_symlink	symlink;
		struct kernfs_elem_attr		attr;
	};

	void			*priv;

	/*
	 * 64bit unique ID.  On 64bit ino setups, id is the ino.  On 32bit,
	 * the low 32bits are ino and upper generation.
	 */
	u64			id;

	unsigned short		flags;
	umode_t			mode;
	struct kernfs_iattrs	*iattr;
};
和其他文件系统一样,sysfs也要经历四个问题
- 挂载:mount操作由
kernfs_get_tree实现 - 文件操作:由
kernfs_get_inode调用iget_locked获取新的inode,再由kernfs_init_inode为其赋值。分为目录、文件、链接三种类型,操作也是受限的,用户空间不具备创建能力。 - 文件查找:由
kernfs_iop_lookup查找,其中第一步调用kernfs_find_ns找到目标kernfs_node对象,第二步调用kernfs_get_inode创建文件(inode)。这其实也是各种基于内存的伪文件系统的通用做法。inode不需要提前创建,访问到的时候创建出来就行。在此之前,伪文件系统只需要存储所需的底层数据结构即可。kernfs的文件查找还使用了红黑树。和/proc类似,sysfs的层级结构实际上是靠kernfs_node维护的。 - I/O:后文展开
kernfs其他数据结构
虽然knernfs_node是核心的数据结构,但kernfs为了其他模块使用起来更方便,还定义了几个辅助结构kobject、kset、attribute、bin_attribute。这几种辅助结构实际上仍然是直接或者间接关联着对应的kernfs_node。kernfs表现上更像是一个内核中很便于使用的依赖库。
kobject 对应kernfs的目录
struct kobject {
	const char		*name;
    // 将kobject连接到所属的kset
	struct list_head	entry;
	struct kobject		*parent;
	struct kset		*kset;
	const struct kobj_type	*ktype;
	struct kernfs_node	*sd; /* sysfs directory entry */
    // 引用计数
	struct kref		kref;
#ifdef CONFIG_DEBUG_KOBJECT_RELEASE
	struct delayed_work	release;
#endif
	unsigned int state_initialized:1;
	unsigned int state_in_sysfs:1;
	unsigned int state_add_uevent_sent:1;
	unsigned int state_remove_uevent_sent:1;
	unsigned int uevent_suppress:1;
};
kset 是一组目录,用list组织了一系列kobject,并且本身也携带一个kobject,以目录形式存在。
/**
 * struct kset - a set of kobjects of a specific type, belonging to a specific subsystem.
 *
 * A kset defines a group of kobjects.  They can be individually
 * different "types" but overall these kobjects all want to be grouped
 * together and operated on in the same manner.  ksets are used to
 * define the attribute callbacks and other common events that happen to
 * a kobject.
 *
 * @list: the list of all kobjects for this kset
 * @list_lock: a lock for iterating over the kobjects
 * @kobj: the embedded kobject for this kset (recursion, isn't it fun...)
 * @uevent_ops: the set of uevent operations for this kset.  These are
 * called whenever a kobject has something happen to it so that the kset
 * can add new environment variables, or filter out the uevents if so
 * desired.
 */
struct kset {
	struct list_head list;
	spinlock_t list_lock;
	struct kobject kobj;
	const struct kset_uevent_ops *uevent_ops;
} __randomize_layout;
attribute和bin_attribute则分别对应可视化、二进制格式的syssf中的普通文件
通过这些数据结构,其他内核模块可以更方便的使用kernfs来使用sysfs。
操作
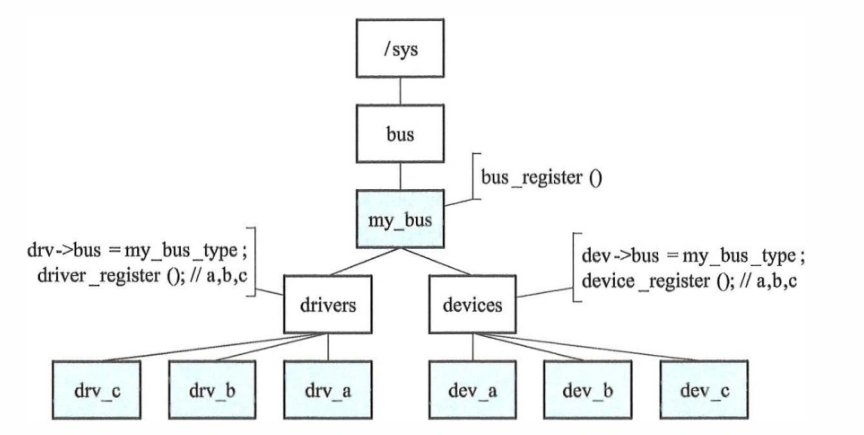
在了解sysfs之前,其实有必要学习一下Linux 设备驱动模型 (Linux Device Driver,LDD)。推荐参考Linux设备模型。对这部分的简单拓展,放到后面的[附录章节](### Linux设备驱动模型简介)
sysfs部分文件函数
| 函数 | 效果 |
|---|---|
| kset_create_and_add | 在parent目录下创建目录 |
| kset_register/unregister | 注册、回收kset |
| kobject_create_and_add | 在parent目录下创建目录 |
| kobject_init/_add | 在parent目录下创建资源 |
| sysfs_create_file | 在kobject目录下创建文件 |
| sysfs_create_bin_file | 创建bin文件 |
kernfs_ops是sysfs的文件所支持的操作,根据文件类型不同,支持的操作略有区别。包括open、read、write、mmap等。
用户通过自定义attribute,可以自定义自己的设备所支持的操作。仍然要理解,sysfs和LDD之间的紧密配合。
实际上从device_attribute可以看出来,sysfs中文件,主要就是读写的功能。并且专门命名为show和store。open和close的功能,由kernfs内部完成,用户不需要关心。设备程序只需要处理自己的属性如何展示、如何写入即可。
/* interface for exporting device attributes */
// 注意这里是show 和 store
struct device_attribute {
	struct attribute	attr;
	ssize_t (*show)(struct device *dev, struct device_attribute *attr,
			char *buf);
	ssize_t (*store)(struct device *dev, struct device_attribute *attr,
			 const char *buf, size_t count);
};
kernfs在创建attribute对应时,绑定相关操作kernfs_dir/file/symlink_fops
static void kernfs_init_inode(struct kernfs_node *kn, struct inode *inode)
{
	kernfs_get(kn);
	inode->i_private = kn;
	inode->i_mapping->a_ops = &ram_aops;
	inode->i_op = &kernfs_iops;
	inode->i_generation = kernfs_gen(kn);

	set_default_inode_attr(inode, kn->mode);
	kernfs_refresh_inode(kn, inode);

	/* initialize inode according to type */
	switch (kernfs_type(kn)) {
	case KERNFS_DIR:
		inode->i_op = &kernfs_dir_iops;
		inode->i_fop = &kernfs_dir_fops;
		if (kn->flags & KERNFS_EMPTY_DIR)
			make_empty_dir_inode(inode);
		break;
	case KERNFS_FILE:
		inode->i_size = kn->attr.size;
		inode->i_fop = &kernfs_file_fops;
		break;
	case KERNFS_LINK:
		inode->i_op = &kernfs_symlink_iops;
		break;
	default:
		BUG();
	}

	unlock_new_inode(inode);
}
ext4
ext4内容非常庞大,此书以及本文只讲解其关键原理部分。
整体结构
ext4核心其实并不是代码,而是ext4的原理和物理布局。一个格式化为ext4的磁盘就已经构成了一个ext4文件系统,无论是否被插在主板上,就是说其信息是完整的。ext4格式下,磁盘中的数据可以分为两部分:
- 文件内容
- metadata,元数据
ext4用block(块)作为单位来组织磁盘。一般是4KB。为了减少碎片,使同一个文件的内容可以落在相邻的块中以便提高访问效率,ext4使用了block group。一个group包含多个block,其中有一个block是专门用来存放group中各个block的使用情况。也就是bitmap的方式,1是使用,0是未使用。此时,一个group的最大大小为4K *4K*8=128MB.
ext4整体上的布局如下图所示
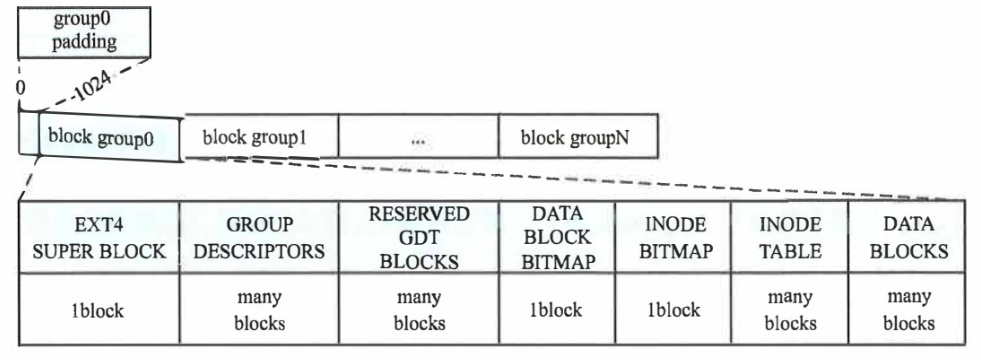
其中,首个group的特殊结构:
- GROUP 0 Padding:是第一个block group特有的,前1024字节,可以用于存放x86的启动信息。其他group不会有padding
- EXT4 SUPER BLOCK:包含整个磁盘文件系统的信息,因为前面提到的padding,这个block从1024字节开始。
- GROUP DESCRIPTORS:包含所有block group的信息,占用的block数目由磁盘的大小决定。
为了防止super block和group descriptor坏掉,后续的一些block group内,根据配置可以将这部分数据进行多次拷贝。
- RESERVED GDT BLOCKS:留作未来扩展文件系统,也用多个block
如果没有ext4 super block和group descriptors。一个block group将从data block bitmap开始。如下所示
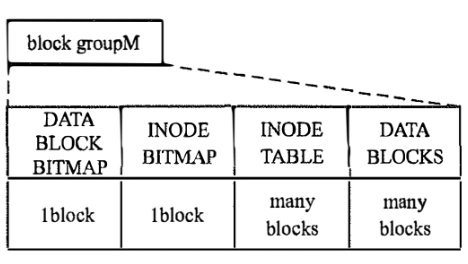
- DATA BLOCK BITMAP:就是刚才说的用于记录block使用情况的bitmap
- INODE BITMAP:和前者类似,但是描述的是inode的使用情况
- INODE TABLE:描述block group内所有的inode的信息。占用大小等于group中inode数目*inode的大小。这里的inode,是文件在磁盘中的元信息,并不直接对应文件系统内存中的inode
- DATA BLOCKS:存放文件内容
ext4特性较多,有几个可能常见的特性
- ext4有一个特性:flexible block group。将几个相邻的block group再组成一组,称为flex_bg。一个flex_bg中的所有group的DATA BLOCK BITMAP、INODE BITMAP和INODE TABLE均存放在第一个block group中。这样就可以让大多数后续block group都只包含DATA BLOCKS。当然还有一些可能会因为配置原因,保存冗余的ext4 super block和group descriptor。注意flex_bg只是为了优化大文件的性能,而不是支持更大的文件。
- Meta Block Groups:其实从前面的定义可以计算,由于group descriptor只能在一个group中存储完整。即使一个block group的descriptor为32字节,那粗略估计,ext4支持的最大磁盘也只能是128MB / 32b * 128MB = 512TB。引入meta_bg,整个文件系统可以被分为多个metablock groups。每一个metablock group包含多个block group,descriptor分别在各自的第一个block group中。磁盘总大小可以扩展更大。
- lazy block group initialization:快速初始化。格式化磁盘,没必要将所有的BITMAP、INODE BITMAP、INODE TABLE都初始化完成。只设置标记位即可。
- bigalloc:block默认大小4KB。对于大文件来说这样会占用很多metadata的空间。bigalloc引入了cluster概念。在格式化的时候,可以设置cluster的大小(Block Cluster Size),此后就是以用户设置的大小为单位来申请数据块。但是block、block bitmap仍然存在,引入cluster只是让block的申请分配变为批量,缓存友好,一定程度上能提高速度。而且可以尽量保证block的相邻性。
可以使用
dumpe2fs命令,来查看文件系统的各种元信息,每个block group的信息。
一般来说,inode表并不是从0开始的,0~10号的inode都是有特殊占用的。
- 0:不存在
- 1:EXT4_BAD_INO
- 2:EXT4_ROOT_INO
- 3:EXT4_USR_QUOTA_INO
- 4:EXT4_GRP_QUOTA_INO
- 5:EXT4_BOOT_LOADER_INO
- 6:EXT4_UNDEL_DIR_INO
- 7:EXT4_RESIZE_INO
- 8:EXT4_JOURNAL_INO
- 9、10:内核暂无定义
详细结构
展开一下超级块的内容
/*
 * Structure of the super block
 */
struct ext4_super_block {
/*00*/	__le32	s_inodes_count;		/* Inodes count */
	__le32	s_blocks_count_lo;	/* Blocks count */
	__le32	s_r_blocks_count_lo;	/* Reserved blocks count */
	__le32	s_free_blocks_count_lo;	/* Free blocks count */
/*10*/	__le32	s_free_inodes_count;	/* Free inodes count */
	__le32	s_first_data_block;	/* First Data Block */
	__le32	s_log_block_size;	/* Block size */
	__le32	s_log_cluster_size;	/* Allocation cluster size */
/*20*/	__le32	s_blocks_per_group;	/* # Blocks per group */
	__le32	s_clusters_per_group;	/* # Clusters per group */
	__le32	s_inodes_per_group;	/* # Inodes per group */
	__le32	s_mtime;		/* Mount time */
/*30*/	__le32	s_wtime;		/* Write time */
	__le16	s_mnt_count;		/* Mount count */
	__le16	s_max_mnt_count;	/* Maximal mount count */
	__le16	s_magic;		/* Magic signature */
	__le16	s_state;		/* File system state */
	__le16	s_errors;		/* Behaviour when detecting errors */
	__le16	s_minor_rev_level;	/* minor revision level */
/*40*/	__le32	s_lastcheck;		/* time of last check */
	__le32	s_checkinterval;	/* max. time between checks */
	__le32	s_creator_os;		/* OS */
	__le32	s_rev_level;		/* Revision level */
/*50*/	__le16	s_def_resuid;		/* Default uid for reserved blocks */
	__le16	s_def_resgid;		/* Default gid for reserved blocks */
	/*
	 * These fields are for EXT4_DYNAMIC_REV superblocks only.
	 *
	 * Note: the difference between the compatible feature set and
	 * the incompatible feature set is that if there is a bit set
	 * in the incompatible feature set that the kernel doesn't
	 * know about, it should refuse to mount the filesystem.
	 *
	 * e2fsck's requirements are more strict; if it doesn't know
	 * about a feature in either the compatible or incompatible
	 * feature set, it must abort and not try to meddle with
	 * things it doesn't understand...
	 */
	__le32	s_first_ino;		/* First non-reserved inode */
	__le16  s_inode_size;		/* size of inode structure */
	__le16	s_block_group_nr;	/* block group # of this superblock */
	__le32	s_feature_compat;	/* compatible feature set */
/*60*/	__le32	s_feature_incompat;	/* incompatible feature set */
	__le32	s_feature_ro_compat;	/* readonly-compatible feature set */
/*68*/	__u8	s_uuid[16];		/* 128-bit uuid for volume */
/*78*/	char	s_volume_name[EXT4_LABEL_MAX];	/* volume name */
/*88*/	char	s_last_mounted[64] __nonstring;	/* directory where last mounted */
/*C8*/	__le32	s_algorithm_usage_bitmap; /* For compression */
	/*
	 * Performance hints.  Directory preallocation should only
	 * happen if the EXT4_FEATURE_COMPAT_DIR_PREALLOC flag is on.
	 */
	__u8	s_prealloc_blocks;	/* Nr of blocks to try to preallocate*/
	__u8	s_prealloc_dir_blocks;	/* Nr to preallocate for dirs */
	__le16	s_reserved_gdt_blocks;	/* Per group desc for online growth */
	/*
	 * Journaling support valid if EXT4_FEATURE_COMPAT_HAS_JOURNAL set.
	 */
/*D0*/	__u8	s_journal_uuid[16];	/* uuid of journal superblock */
/*E0*/	__le32	s_journal_inum;		/* inode number of journal file */
	__le32	s_journal_dev;		/* device number of journal file */
	__le32	s_last_orphan;		/* start of list of inodes to delete */
	__le32	s_hash_seed[4];		/* HTREE hash seed */
	__u8	s_def_hash_version;	/* Default hash version to use */
	__u8	s_jnl_backup_type;
	__le16  s_desc_size;		/* size of group descriptor */
/*100*/	__le32	s_default_mount_opts;
	__le32	s_first_meta_bg;	/* First metablock block group */
	__le32	s_mkfs_time;		/* When the filesystem was created */
	__le32	s_jnl_blocks[17];	/* Backup of the journal inode */
	/* 64bit support valid if EXT4_FEATURE_COMPAT_64BIT */
/*150*/	__le32	s_blocks_count_hi;	/* Blocks count */
	__le32	s_r_blocks_count_hi;	/* Reserved blocks count */
	__le32	s_free_blocks_count_hi;	/* Free blocks count */
	__le16	s_min_extra_isize;	/* All inodes have at least # bytes */
	__le16	s_want_extra_isize; 	/* New inodes should reserve # bytes */
	__le32	s_flags;		/* Miscellaneous flags */
	__le16  s_raid_stride;		/* RAID stride */
	__le16  s_mmp_update_interval;  /* # seconds to wait in MMP checking */
	__le64  s_mmp_block;            /* Block for multi-mount protection */
	__le32  s_raid_stripe_width;    /* blocks on all data disks (N*stride)*/
	__u8	s_log_groups_per_flex;  /* FLEX_BG group size */
	__u8	s_checksum_type;	/* metadata checksum algorithm used */
	__u8	s_encryption_level;	/* versioning level for encryption */
	__u8	s_reserved_pad;		/* Padding to next 32bits */
	__le64	s_kbytes_written;	/* nr of lifetime kilobytes written */
	__le32	s_snapshot_inum;	/* Inode number of active snapshot */
	__le32	s_snapshot_id;		/* sequential ID of active snapshot */
	__le64	s_snapshot_r_blocks_count; /* reserved blocks for active
					      snapshot's future use */
	__le32	s_snapshot_list;	/* inode number of the head of the
					   on-disk snapshot list */
#define EXT4_S_ERR_START offsetof(struct ext4_super_block, s_error_count)
	__le32	s_error_count;		/* number of fs errors */
	__le32	s_first_error_time;	/* first time an error happened */
	__le32	s_first_error_ino;	/* inode involved in first error */
	__le64	s_first_error_block;	/* block involved of first error */
	__u8	s_first_error_func[32] __nonstring;	/* function where the error happened */
	__le32	s_first_error_line;	/* line number where error happened */
	__le32	s_last_error_time;	/* most recent time of an error */
	__le32	s_last_error_ino;	/* inode involved in last error */
	__le32	s_last_error_line;	/* line number where error happened */
	__le64	s_last_error_block;	/* block involved of last error */
	__u8	s_last_error_func[32] __nonstring;	/* function where the error happened */
#define EXT4_S_ERR_END offsetof(struct ext4_super_block, s_mount_opts)
	__u8	s_mount_opts[64];
	__le32	s_usr_quota_inum;	/* inode for tracking user quota */
	__le32	s_grp_quota_inum;	/* inode for tracking group quota */
	__le32	s_overhead_clusters;	/* overhead blocks/clusters in fs */
	__le32	s_backup_bgs[2];	/* groups with sparse_super2 SBs */
	__u8	s_encrypt_algos[4];	/* Encryption algorithms in use  */
	__u8	s_encrypt_pw_salt[16];	/* Salt used for string2key algorithm */
	__le32	s_lpf_ino;		/* Location of the lost+found inode */
	__le32	s_prj_quota_inum;	/* inode for tracking project quota */
	__le32	s_checksum_seed;	/* crc32c(uuid) if csum_seed set */
	__u8	s_wtime_hi;
	__u8	s_mtime_hi;
	__u8	s_mkfs_time_hi;
	__u8	s_lastcheck_hi;
	__u8	s_first_error_time_hi;
	__u8	s_last_error_time_hi;
	__u8	s_first_error_errcode;
	__u8    s_last_error_errcode;
	__le16  s_encoding;		/* Filename charset encoding */
	__le16  s_encoding_flags;	/* Filename charset encoding flags */
	__le32  s_orphan_file_inum;	/* Inode for tracking orphan inodes */
	__le32	s_reserved[94];		/* Padding to the end of the block */
	__le32	s_checksum;		/* crc32c(superblock) */
};
书上做了一个简单的实验,用sudo dumpe2fs /dev/sdax来导出文件系统的信息,并用sudo hexdump /dev/sdax -s 1024 -n 1024,进行手动解析,最终内容是一样的。不过需要注意的是,由于大小端序的存在,因此ext4设计了一个s_magic,用于系统判断磁盘上内容创建时的机器端序是否和当前系统cpu一致。如果不一致,会自动做转换。下面是一点实例。
以下是查看super block
$ sudo hexdump /dev/sda2 -s 1024 -n 1024 13 ✘
0000400 0000 0064 fd00 018f ffd9 0013 f594 012f
0000410 d280 005f 0000 0000 0002 0000 0002 0000
0000420 8000 0000 8000 0000 2000 0000 b4ea 68ef
0000430 b4e9 68ef 0013 ffff ef53 0001 0001 0000 # 注意ef53就是s_magic
...
$ sudo dumpe2fs /dev/sda2 | less
...
Inode count: 6553600 # 0000 0064字节序调整后是0x00640000
Block count: 26213632 # fd00 018f字节序调整后是0x018ffd00
...
同样的方法,还可以用来查看ext4_group_desc。也就是描述block group的group descriptor。该内容在32位和64位模式下不同。根据布局,我们可以知道,第一个ext4_group_desc在block2中开始。书中的实验查看了第二个block group的desc。sudo hexdump /dev/sda2 -s 4160 -n 32。
ext4_inode比较重要。在这里再次展开一下内容。
/*
 * Structure of an inode on the disk
 */
struct ext4_inode {
	__le16	i_mode;		/* File mode 文件模式 */
	__le16	i_uid;		/* Low 16 bits of Owner Uid */
	__le32	i_size_lo;	/* Size in bytes 文件大小 */
	__le32	i_atime;	/* Access time 最后访问时间 */
	__le32	i_ctime;	/* Inode Change time */
	__le32	i_mtime;	/* Modification time */
	__le32	i_dtime;	/* Deletion Time */
	__le16	i_gid;		/* Low 16 bits of Group Id */
	__le16	i_links_count;	/* Links count 硬链接数量,从前文我们可以知道,这实际上限制了直接子目录的数量 */
	__le32	i_blocks_lo;	/* Blocks count “块”数量的低32位,这里的块是512字节,受传统磁盘扇区影响*/
	__le32	i_flags;	/* File flags */
	union {
		struct {
			__le32  l_i_version;
		} linux1;
		struct {
			__u32  h_i_translator;
		} hurd1;
		struct {
			__u32  m_i_reserved1;
		} masix1;
	} osd1;				/* OS dependent 1 */
	__le32	i_block[EXT4_N_BLOCKS];/* Pointers to blocks */
	__le32	i_generation;	/* File version (for NFS) */
	__le32	i_file_acl_lo;	/* File ACL */
	__le32	i_size_high;
	__le32	i_obso_faddr;	/* Obsoleted fragment address */
	union {
		struct {
			__le16	l_i_blocks_high; /* were l_i_reserved1 */
			__le16	l_i_file_acl_high;
			__le16	l_i_uid_high;	/* these 2 fields */
			__le16	l_i_gid_high;	/* were reserved2[0] */
			__le16	l_i_checksum_lo;/* crc32c(uuid+inum+inode) LE */
			__le16	l_i_reserved;
		} linux2;
		struct {
			__le16	h_i_reserved1;	/* Obsoleted fragment number/size which are removed in ext4 */
			__u16	h_i_mode_high;
			__u16	h_i_uid_high;
			__u16	h_i_gid_high;
			__u32	h_i_author;
		} hurd2;
		struct {
			__le16	h_i_reserved1;	/* Obsoleted fragment number/size which are removed in ext4 */
			__le16	m_i_file_acl_high;
			__u32	m_i_reserved2[2];
		} masix2;
	} osd2;				/* OS dependent 2 */
	__le16	i_extra_isize;
	__le16	i_checksum_hi;	/* crc32c(uuid+inum+inode) BE */
	__le32  i_ctime_extra;  /* extra Change time      (nsec << 2 | epoch) */
	__le32  i_mtime_extra;  /* extra Modification time(nsec << 2 | epoch) */
	__le32  i_atime_extra;  /* extra Access time      (nsec << 2 | epoch) */
	__le32  i_crtime;       /* File Creation time */
	__le32  i_crtime_extra; /* extra FileCreationtime (nsec << 2 | epoch) */
	__le32  i_version_hi;	/* high 32 bits for 64-bit version */
	__le32	i_projid;	/* Project ID */
};
给定一个inode号为ino的文件,其inode项位置计算路径:
- 所在的block group为
(ino - 1) / ext4_super_block->s_inodes_per_group。 - 在block group内的索引号index=
(ino - 1) % ext4_super_block->s_inodes_per_group。也就是当前block group内的第index个inode。 - 在inode table内的位置是
index * ext4_super_block->s_inode_size。当然,这一步需要先找到inode table所在的block。
对于普通文件,其文件内容存储于最终的block。对于目录也是一样,而且其文件内容是目录下文件的信息。每一个文件的目录项,是如下的结构(两个版本但是互相兼容)。
struct ext4_dir_entry {
	__le32	inode;			/* Inode number 这里也可以复习一下,硬链接其实只是新增了一个entry项*/
	__le16	rec_len;		/* Directory entry length */
	__le16	name_len;		/* Name length */
	char	name[EXT4_NAME_LEN];	/* File name */
};

struct ext4_dir_entry_2 {
	__le32	inode;			/* Inode number */
	__le16	rec_len;		/* Directory entry length */
	__u8	name_len;		/* Name length */
	__u8	file_type;		/* See file type macros EXT4_FT_* below */
	char	name[EXT4_NAME_LEN];	/* File name */
};
在目录项不多的情况下,就是一个block内可以放下所有entry时,这些entry紧密排列。但当一个block不够之后,目录的组织方式会变为哈希树,而不是直接使用更多block。到时一个entry将会根据文件名字做哈希,并存入相关的block,以避免遍历多个block。具体的原理本书并不展开。此时目录文件内容将会改为包括一个dx_root结构体的内容。
挂载
挂载通过ext4_get_tree完成。该函数就是一个包装。实际上是get_tree_bdev函数内调用ext4_file_super执行的。步骤
- 初步读取ext4_super_block
- 从读取到的block大小,重新读取,并得到完整的ext4_super_block
- 创建ext4_sb_info
- 检查所有的group descriptor合法性
- 调用ext4_iget获取root文件。注意上面说过,root文件的ino号是固定的。创建dentry。
注意
- ext4文件系统并没有要求必须使用32、64位系统,但是挂载时选择的一些特性,可能会导致无法在另一种位宽下使用。
- 类似的问题,inode on disk结构的大小其实不是固定的,内核需要考虑到文件创建时的ext4版本,与当前系统内核所使用的ext4版本不一定完全一致。
- ext4不等同于vfs。所以要注意ext4的inode其实是inode on disk(书中所用的表述方式)。
ext4_sb_info和ext4_inode_info辅助建立vfs和ext4之间的关系。 - 挂载时,因为一开始不知道block的大小(注意是block大小也不知道),所以也不清楚super block的大小。先假定1024,读取一些字段之后再重新计算,并读取完整的super block,这其实对sb的字段设计有一些要求。也就是在读取前几个字段之后,就可以知道真实的super block大小了。
- 挂载过程中,函数
ext4_geometry_check:用于检查磁盘上的结构是否满足ext4标准设计。 - ext4设计中,确实会出现inode和block分配不平衡的问题。就是某一个block group可能inode耗尽但block空闲, 或者反之。flex_bg等手段可以一定程度缓解。
文件IO
注意区分,读写某个具体block,是驱动的工作。而VFS中ext4文件系统的实现,只需要负责找到这个block。
ext4_inode的i_block字段是文件IO的寻址过程中的起始数据。这个字段的实际内容,有Direct/Indirect Map和Extent Tree(区段树)两种方式。
如果一个block号需要4个字节,显然这里只能存下15个block,那么文件最大只能15个block。这显然不能满足需求。
映射的方案是ext2/ext3就引入了的。前12个元素仍然保存block号,这部分是直接映射。后三个元素分别使用1,2,3级间接映射。每一级的元素中存储的block号,都是指向下一级的映射表所在的block。
ext4则改为使用区段树。之前一个block需要用一个项映射,这太浪费空间了,区段树是用一个数据结构,对应一个区间中的block。既然是树,那么就需要一个完整的树的结构,叶子节点、中间节点、树根分别如下所示。
/*
 * This is the extent on-disk structure.
 * It's used at the bottom of the tree.
 */
struct ext4_extent {
	__le32	ee_block;	/* first logical block extent covers 逻辑块号,可以理解为叶子节点从0到n的编号 */
	__le16	ee_len;		/* number of blocks covered by extent 块数量 */
	__le16	ee_start_hi;	/* high 16 bits of physical block 指向的第一个物理块号高16位 */
	__le32	ee_start_lo;	/* low 32 bits of physical block 指向第一个物理块号低32位 */
};

/*
 * This is index on-disk structure.
 * It's used at all the levels except the bottom.
 */
struct ext4_extent_idx {
	__le32	ei_block;	/* index covers logical blocks from 'block' 逻辑block区间的起始值 */
	__le32	ei_leaf_lo;	/* pointer to the physical block of the next *
				 * level. leaf or next index could be there */
	__le16	ei_leaf_hi;	/* high 16 bits of physical block */
	__u16	ei_unused;
};

/*
 * Each block (leaves and indexes), even inode-stored has header.
 */
struct ext4_extent_header {
	__le16	eh_magic;	/* probably will support different formats */
	__le16	eh_entries;	/* number of valid entries */
	__le16	eh_max;		/* capacity of store in entries */
	__le16	eh_depth;	/* has tree real underlying blocks? */
	__le32	eh_generation;	/* generation of the tree */
};
注意理解逻辑块号(将当前文件所有块,按叶子节点顺序从0到n来计数),以及物理块号(磁盘上实际读写用的块号)。也正因如此:
- 32位的逻辑块号,限制了单文件最多只能是16TiB。
- 更多的物理块号空间,使得我们实际上可以支持更大的(虚拟)磁盘容量。
p.s. 个人认为其实这里细节不用了解太多。ext4出现时64位系统尚未普及。现在看起来,它里面的很多高32位、低32位设计,其实已经是时代的眼泪了。
删除文件实际上只是删除了目录项、inode内容等meta数据。磁盘上实际文件内容是存在的。

一个简化的同步阻塞风格的,传统请求队列式(request-queue)的,完整的文件I/O函数调用流程:【此处为AI生成、存疑】
- 发起流程:read、sys_read、vfs_read、ext4_file_read_iter、generic_file_read_iter、ext4_read_folio、submit_bio、ahci_fill_cmd_slot(发送块设备读取命令,但是我暂时没有找到调用路径)
- 后续硬件执行读取/DMA到指定缓冲区、并在读取完成后中断处理:ahci_irq_handler、mpage_end_io、end_page_read、folio_unlock
- 再generic_file_read_iter中,等待解锁,完成copy_folio_to_iter、sys_read返回
如果是IOCB_DIRECT直接IO,那么中间不会尝试读缓存页,会直接读盘。否则从generic_file_read_iter到ext4_read_folio中间,其实是包含内存folio的处理流程(后者最终被绑定到mapping->a_ops->read_folio)。而如果使用异步非阻塞,则这里的流程也会更复杂。
补充内容
在刚刚的位置提到了请求队列。这是linux内核处理I/O请求的一个方式。从submit_bio开始,调用进入到linux内核的block layer。目前分为两种
- Queue Dispatch:分为单队列(blk-sq)和多队列(blk-mq)。简单来说就是一个块设备一个队列,和一个块设备多个队列。单队列是比较早的linux内核了,因为存储器件速度越来越快,且cpu核数越来越多,导致很多cpu时间被用在单队列的插入锁的竞争中。从linux5.x后期开始,单队列被移除出内核,默认多队列。
- Direct Dispatch:这种将会由bio直接提交到驱动,但也需要驱动的支持。满足条件的情况下不需要再经过原有的bio->request queue->驱动的路径,而是blk_mq_make_request中直接提交到驱动。可以阅读函数blk_mq_submit_bio,最终调用到__blk_mq_try_issue_directly。
关于设备层的设计和实现又是另一个庞大的话题了,这部分可以稍加参考:blk-mq架构分析、Linux IO请求处理流程-蓄洪和泄洪。可以简单理解为这里需要实现内核和驱动之间的调度系统,比如排队、批量处理等,以提高块设备的利用效率。
个人代码实践
-
【TODO】找一个内存部分章节适合的作业内容
-
编写ko,打印指定路径文件的inode。【运行环境,ubuntu 24.04】
// 本段代码使用AI生成

// safe_inode_dumper.c
#include <linux/module.h>
#include <linux/kernel.h>
#include <linux/init.h>
#include <linux/fs.h>
#include <linux/namei.h>  // for kern_path
// #include <linux/kstrtol.h>

MODULE_LICENSE("GPL");
MODULE_AUTHOR("YourName");
MODULE_DESCRIPTION("Safely dump inode info via path");
MODULE_VERSION("0.1");

static char *target_path = NULL;
module_param(target_path, charp, 0);
MODULE_PARM_DESC(target_path, "Path to the file/directory whose inode to dump");

static void dump_inode(struct inode *inode)
{
    if (!inode) return;

    printk(KERN_INFO "=== INODE DUMP: %lu ===\n", inode->i_ino);
    printk(KERN_INFO "  Size: %lld\n", inode->i_size);
    printk(KERN_INFO "  Mode: 0%o\n", inode->i_mode);
    printk(KERN_INFO "  UID: %u, GID: %u\n",
        from_kuid(&init_user_ns, inode->i_uid),
        from_kgid(&init_user_ns, inode->i_gid));
    printk(KERN_INFO "  Links: %u\n", inode->i_nlink);
    printk(KERN_INFO "  Blocks: %llu\n", inode->i_blocks);
    printk(KERN_INFO "  Dev: %u:%u\n", MAJOR(inode->i_sb->s_dev), MINOR(inode->i_sb->s_dev));
    printk(KERN_INFO "  FS: %s\n", inode->i_sb->s_type->name);
    printk(KERN_INFO "=====================\n");
}

static int __init safe_dumper_init(void)
{
    struct path path;
    struct inode *inode;
    int err;

    if (!target_path) {
        printk(KERN_ERR "safe_dumper: no path specified. use target_path=/path/to/file\n");
        return -EINVAL;
    }

    // 通过路径查找 dentry 和 inode
    err = kern_path(target_path, LOOKUP_FOLLOW, &path);
    if (err) {
        printk(KERN_ERR "safe_dumper: path '%s' not found: %d\n", target_path, err);
        return err;
    }

    inode = d_inode(path.dentry);
    if (!inode) {
        printk(KERN_ERR "safe_dumper: no inode at path '%s'\n", target_path);
        path_put(&path);
        return -ENOENT;
    }

    printk(KERN_INFO "safe_dumper: Found inode %lu for path '%s'\n", inode->i_ino, target_path);
    dump_inode(inode);

    path_put(&path);  // 释放引用
    return 0;
}

static void __exit safe_dumper_exit(void)
{
    printk(KERN_INFO "safe_dumper: unloaded\n");
}

module_init(safe_dumper_init);
module_exit(safe_dumper_exit);
配套Makefile,注意C文件名必须为safe_inode_dumper,和obj-m中对应。
obj-m += safe_inode_dumper.o KDIR := /lib/modules/$(shell uname -r)/build all: $(MAKE) -C $(KDIR) M=$(PWD) modules clean: $(MAKE) -C $(KDIR) M=$(PWD) clean install: sudo insmod safe_inode_dumper.ko target_path='/tmp' remove: sudo rmmod safe_inode_dumper dmesg: dmesg | tail -20 -
【TODO】实现一个自定义文件系统
-
【TODO】实现一个自定义设备的驱动,并支持sysfs、udev子系统
附录
其他内核代码工具
EXPORT_SYMBOL:将符号导出为内核全局符号,供其他模块使用
Linux设备驱动模型简介
先思考一下,一个支持即插即用的设备模型需要具备的功能:
- 自动检测系统中添加和移除的设备
- 资源管理,解决不同设备资源间的冲突
- 支持对设备进行软件配置
- 需要时可以自动加载新设备所需的驱动程序
- 需要时可以进行热插拔
在这些需求下,要求BIOS、操作系统、设备都具备相应的支持能力
内核则使用不同的对象来描述一些实体:
- device:连接到某种总线的设备
- driver:驱动程序
- bus:总线,一种用于连接其他设备的设备
- class:设备的类别,用于分类描述不同行为
- subsystem:子系统
设备驱动模型就是基于前面讲述的kobject来构建层级的。通常kobject被作为成员来整合到设备相关的更大的结构之中。下面摘抄几个经典数据结构。
各种类型的注册和取消注册基本都是:xxx_register()、xxx_unregister()。
内核&驱动在发现设备之后,需要执行注册设备,创建kobject,创建sysfs的工作,并发出相关的uevent。
基本的设备类型
/**
 * struct device - The basic device structure
 * @parent:	The device's "parent" device, the device to which it is attached.
 * 		In most cases, a parent device is some sort of bus or host
 * 		controller. If parent is NULL, the device, is a top-level device,
 * 		which is not usually what you want.
 * @p:		Holds the private data of the driver core portions of the device.
 * 		See the comment of the struct device_private for detail.
 * @kobj:	A top-level, abstract class from which other classes are derived.
 * @init_name:	Initial name of the device.
 * @type:	The type of device.
 * 		This identifies the device type and carries type-specific
 * 		information.
 * @mutex:	Mutex to synchronize calls to its driver.
 * @bus:	Type of bus device is on.
 * @driver:	Which driver has allocated this
 * @platform_data: Platform data specific to the device.
 * 		Example: For devices on custom boards, as typical of embedded
 * 		and SOC based hardware, Linux often uses platform_data to point
 * 		to board-specific structures describing devices and how they
 * 		are wired.  That can include what ports are available, chip
 * 		variants, which GPIO pins act in what additional roles, and so
 * 		on.  This shrinks the "Board Support Packages" (BSPs) and
 * 		minimizes board-specific #ifdefs in drivers.
 * @driver_data: Private pointer for driver specific info.
 * @links:	Links to suppliers and consumers of this device.
 * @power:	For device power management.
 *		See Documentation/driver-api/pm/devices.rst for details.
 * @pm_domain:	Provide callbacks that are executed during system suspend,
 * 		hibernation, system resume and during runtime PM transitions
 * 		along with subsystem-level and driver-level callbacks.
 * @em_pd:	device's energy model performance domain
 * @pins:	For device pin management.
 *		See Documentation/driver-api/pin-control.rst for details.
 * @msi:	MSI related data
 * @numa_node:	NUMA node this device is close to.
 * @dma_ops:    DMA mapping operations for this device.
 * @dma_mask:	Dma mask (if dma'ble device).
 * @coherent_dma_mask: Like dma_mask, but for alloc_coherent mapping as not all
 * 		hardware supports 64-bit addresses for consistent allocations
 * 		such descriptors.
 * @bus_dma_limit: Limit of an upstream bridge or bus which imposes a smaller
 *		DMA limit than the device itself supports.
 * @dma_range_map: map for DMA memory ranges relative to that of RAM
 * @dma_parms:	A low level driver may set these to teach IOMMU code about
 * 		segment limitations.
 * @dma_pools:	Dma pools (if dma'ble device).
 * @dma_mem:	Internal for coherent mem override.
 * @cma_area:	Contiguous memory area for dma allocations
 * @dma_io_tlb_mem: Pointer to the swiotlb pool used.  Not for driver use.
 * @archdata:	For arch-specific additions.
 * @of_node:	Associated device tree node.
 * @fwnode:	Associated device node supplied by platform firmware.
 * @devt:	For creating the sysfs "dev".
 * @id:		device instance
 * @devres_lock: Spinlock to protect the resource of the device.
 * @devres_head: The resources list of the device.
 * @knode_class: The node used to add the device to the class list.
 * @class:	The class of the device.
 * @groups:	Optional attribute groups.
 * @release:	Callback to free the device after all references have
 * 		gone away. This should be set by the allocator of the
 * 		device (i.e. the bus driver that discovered the device).
 * @iommu_group: IOMMU group the device belongs to.
 * @iommu:	Per device generic IOMMU runtime data
 * @physical_location: Describes physical location of the device connection
 *		point in the system housing.
 * @removable:  Whether the device can be removed from the system. This
 *              should be set by the subsystem / bus driver that discovered
 *              the device.
 *
 * @offline_disabled: If set, the device is permanently online.
 * @offline:	Set after successful invocation of bus type's .offline().
 * @of_node_reused: Set if the device-tree node is shared with an ancestor
 *              device.
 * @state_synced: The hardware state of this device has been synced to match
 *		  the software state of this device by calling the driver/bus
 *		  sync_state() callback.
 * @can_match:	The device has matched with a driver at least once or it is in
 *		a bus (like AMBA) which can't check for matching drivers until
 *		other devices probe successfully.
 * @dma_coherent: this particular device is dma coherent, even if the
 *		architecture supports non-coherent devices.
 * @dma_ops_bypass: If set to %true then the dma_ops are bypassed for the
 *		streaming DMA operations (->map_* / ->unmap_* / ->sync_*),
 *		and optionall (if the coherent mask is large enough) also
 *		for dma allocations.  This flag is managed by the dma ops
 *		instance from ->dma_supported.
 *
 * At the lowest level, every device in a Linux system is represented by an
 * instance of struct device. The device structure contains the information
 * that the device model core needs to model the system. Most subsystems,
 * however, track additional information about the devices they host. As a
 * result, it is rare for devices to be represented by bare device structures;
 * instead, that structure, like kobject structures, is usually embedded within
 * a higher-level representation of the device.
 */
struct device {
	struct kobject kobj;
	struct device		*parent;

	struct device_private	*p;

	const char		*init_name; /* initial name of the device */
	const struct device_type *type;

	struct bus_type	*bus;		/* type of bus device is on */
	struct device_driver *driver;	/* which driver has allocated this
					   device */
	void		*platform_data;	/* Platform specific data, device
					   core doesn't touch it */
	void		*driver_data;	/* Driver data, set and get with
					   dev_set_drvdata/dev_get_drvdata */
	struct mutex		mutex;	/* mutex to synchronize calls to
					 * its driver.
					 */

	struct dev_links_info	links;
	struct dev_pm_info	power;
	struct dev_pm_domain	*pm_domain;

#ifdef CONFIG_ENERGY_MODEL
	struct em_perf_domain	*em_pd;
#endif

#ifdef CONFIG_PINCTRL
	struct dev_pin_info	*pins;
#endif
	struct dev_msi_info	msi;
#ifdef CONFIG_DMA_OPS
	const struct dma_map_ops *dma_ops;
#endif
	u64		*dma_mask;	/* dma mask (if dma'able device) */
	u64		coherent_dma_mask;/* Like dma_mask, but for
					     alloc_coherent mappings as
					     not all hardware supports
					     64 bit addresses for consistent
					     allocations such descriptors. */
	u64		bus_dma_limit;	/* upstream dma constraint */
	const struct bus_dma_region *dma_range_map;

	struct device_dma_parameters *dma_parms;

	struct list_head	dma_pools;	/* dma pools (if dma'ble) */

#ifdef CONFIG_DMA_DECLARE_COHERENT
	struct dma_coherent_mem	*dma_mem; /* internal for coherent mem
					     override */
#endif
#ifdef CONFIG_DMA_CMA
	struct cma *cma_area;		/* contiguous memory area for dma
					   allocations */
#endif
#ifdef CONFIG_SWIOTLB
	struct io_tlb_mem *dma_io_tlb_mem;
#endif
	/* arch specific additions */
	struct dev_archdata	archdata;

	struct device_node	*of_node; /* associated device tree node */
	struct fwnode_handle	*fwnode; /* firmware device node */

#ifdef CONFIG_NUMA
	int		numa_node;	/* NUMA node this device is close to */
#endif
	dev_t			devt;	/* dev_t, creates the sysfs "dev" */
	u32			id;	/* device instance */

	spinlock_t		devres_lock;
	struct list_head	devres_head;

	struct class		*class;
	const struct attribute_group **groups;	/* optional groups */

    // 设备计数器达到0时将会调用
	void	(*release)(struct device *dev);
	struct iommu_group	*iommu_group;
	struct dev_iommu	*iommu;

	struct device_physical_location *physical_location;

	enum device_removable	removable;

	bool			offline_disabled:1;
	bool			offline:1;
	bool			of_node_reused:1;
	bool			state_synced:1;
	bool			can_match:1;
#if defined(CONFIG_ARCH_HAS_SYNC_DMA_FOR_DEVICE) || \
    defined(CONFIG_ARCH_HAS_SYNC_DMA_FOR_CPU) || \
    defined(CONFIG_ARCH_HAS_SYNC_DMA_FOR_CPU_ALL)
	bool			dma_coherent:1;
#endif
#ifdef CONFIG_DMA_OPS_BYPASS
	bool			dma_ops_bypass : 1;
#endif
};
总线类型
/**
 * struct bus_type - The bus type of the device
 *
 * @name:	The name of the bus.
 * @dev_name:	Used for subsystems to enumerate devices like ("foo%u", dev->id).
 * @dev_root:	Default device to use as the parent.
 * @bus_groups:	Default attributes of the bus.
 * @dev_groups:	Default attributes of the devices on the bus.
 * @drv_groups: Default attributes of the device drivers on the bus.
 * @match:	Called, perhaps multiple times, whenever a new device or driver
 *		is added for this bus. It should return a positive value if the
 *		given device can be handled by the given driver and zero
 *		otherwise. It may also return error code if determining that
 *		the driver supports the device is not possible. In case of
 *		-EPROBE_DEFER it will queue the device for deferred probing.
 * @uevent:	Called when a device is added, removed, or a few other things
 *		that generate uevents to add the environment variables.
 * @probe:	Called when a new device or driver add to this bus, and callback
 *		the specific driver's probe to initial the matched device.
 * @sync_state:	Called to sync device state to software state after all the
 *		state tracking consumers linked to this device (present at
 *		the time of late_initcall) have successfully bound to a
 *		driver. If the device has no consumers, this function will
 *		be called at late_initcall_sync level. If the device has
 *		consumers that are never bound to a driver, this function
 *		will never get called until they do.
 * @remove:	Called when a device removed from this bus.
 * @shutdown:	Called at shut-down time to quiesce the device.
 *
 * @online:	Called to put the device back online (after offlining it).
 * @offline:	Called to put the device offline for hot-removal. May fail.
 *
 * @suspend:	Called when a device on this bus wants to go to sleep mode.
 * @resume:	Called to bring a device on this bus out of sleep mode.
 * @num_vf:	Called to find out how many virtual functions a device on this
 *		bus supports.
 * @dma_configure:	Called to setup DMA configuration on a device on
 *			this bus.
 * @dma_cleanup:	Called to cleanup DMA configuration on a device on
 *			this bus.
 * @pm:		Power management operations of this bus, callback the specific
 *		device driver's pm-ops.
 * @iommu_ops:  IOMMU specific operations for this bus, used to attach IOMMU
 *              driver implementations to a bus and allow the driver to do
 *              bus-specific setup
 * @p:		The private data of the driver core, only the driver core can
 *		touch this.
 * @lock_key:	Lock class key for use by the lock validator
 * @need_parent_lock:	When probing or removing a device on this bus, the
 *			device core should lock the device's parent.
 *
 * A bus is a channel between the processor and one or more devices. For the
 * purposes of the device model, all devices are connected via a bus, even if
 * it is an internal, virtual, "platform" bus. Buses can plug into each other.
 * A USB controller is usually a PCI device, for example. The device model
 * represents the actual connections between buses and the devices they control.
 * A bus is represented by the bus_type structure. It contains the name, the
 * default attributes, the bus' methods, PM operations, and the driver core's
 * private data.
 */
struct bus_type {
	const char		*name;
	const char		*dev_name;
	struct device		*dev_root;
	const struct attribute_group **bus_groups;
	const struct attribute_group **dev_groups;
	const struct attribute_group **drv_groups;

    // 向bus添加新设备、新驱动程序
	int (*match)(struct device *dev, struct device_driver *drv);
    // 热插拔事件,用于热插拔设备,旧版为hotplug函数。
	int (*uevent)(struct device *dev, struct kobj_uevent_env *env);
	int (*probe)(struct device *dev);
	void (*sync_state)(struct device *dev);
	void (*remove)(struct device *dev);
	void (*shutdown)(struct device *dev);

	int (*online)(struct device *dev);
	int (*offline)(struct device *dev);

	int (*suspend)(struct device *dev, pm_message_t state);
	int (*resume)(struct device *dev);

	int (*num_vf)(struct device *dev);

	int (*dma_configure)(struct device *dev);
	void (*dma_cleanup)(struct device *dev);

	const struct dev_pm_ops *pm;

	const struct iommu_ops *iommu_ops;

    // 总线上的其他操作、属性,都封装到驱动程序的私有数据中
	struct subsys_private *p;
	struct lock_class_key lock_key;

	bool need_parent_lock;
};
设备驱动程序
/**
 * struct device_driver - The basic device driver structure
 * @name:	Name of the device driver.
 * @bus:	The bus which the device of this driver belongs to.
 * @owner:	The module owner.
 * @mod_name:	Used for built-in modules.
 * @suppress_bind_attrs: Disables bind/unbind via sysfs.
 * @probe_type:	Type of the probe (synchronous or asynchronous) to use.
 * @of_match_table: The open firmware table.
 * @acpi_match_table: The ACPI match table.
 * @probe:	Called to query the existence of a specific device,
 *		whether this driver can work with it, and bind the driver
 *		to a specific device.
 * @sync_state:	Called to sync device state to software state after all the
 *		state tracking consumers linked to this device (present at
 *		the time of late_initcall) have successfully bound to a
 *		driver. If the device has no consumers, this function will
 *		be called at late_initcall_sync level. If the device has
 *		consumers that are never bound to a driver, this function
 *		will never get called until they do.
 * @remove:	Called when the device is removed from the system to
 *		unbind a device from this driver.
 * @shutdown:	Called at shut-down time to quiesce the device.
 * @suspend:	Called to put the device to sleep mode. Usually to a
 *		low power state.
 * @resume:	Called to bring a device from sleep mode.
 * @groups:	Default attributes that get created by the driver core
 *		automatically.
 * @dev_groups:	Additional attributes attached to device instance once
 *		it is bound to the driver.
 * @pm:		Power management operations of the device which matched
 *		this driver.
 * @coredump:	Called when sysfs entry is written to. The device driver
 *		is expected to call the dev_coredump API resulting in a
 *		uevent.
 * @p:		Driver core's private data, no one other than the driver
 *		core can touch this.
 *
 * The device driver-model tracks all of the drivers known to the system.
 * The main reason for this tracking is to enable the driver core to match
 * up drivers with new devices. Once drivers are known objects within the
 * system, however, a number of other things become possible. Device drivers
 * can export information and configuration variables that are independent
 * of any specific device.
 */
struct device_driver {
	const char		*name;
	struct bus_type		*bus;

	struct module		*owner;
	const char		*mod_name;	/* used for built-in modules */

	bool suppress_bind_attrs;	/* disables bind/unbind via sysfs */
	enum probe_type probe_type;

	const struct of_device_id	*of_match_table;
	const struct acpi_device_id	*acpi_match_table;

	int (*probe) (struct device *dev);
	void (*sync_state)(struct device *dev);
	int (*remove) (struct device *dev);
	void (*shutdown) (struct device *dev);
	int (*suspend) (struct device *dev, pm_message_t state);
	int (*resume) (struct device *dev);
	const struct attribute_group **groups;
	const struct attribute_group **dev_groups;

	const struct dev_pm_ops *pm;
	void (*coredump) (struct device *dev);

	struct driver_private *p;
};
课后问题
-
进程控制块中包含了进程页表的基址,那进程控制块本身所在的虚拟内存,由谁的页表管理,以及其内存基址如何存储?如何避免套娃问题?
【TODO】涉及到内核启动、分页机制、进程管理的启动
-
物理内存是否可以热插拔,热插拔是否会引起直接映射区的重新映射?将被拔出的内存中的数据如何保存?
-
malloc、free的底层原理,他们是如何操作brk这个系统调用的
堆内存由glibc管理。每次调用brk改变堆内存大小。系统调用是有代价的,所以每次申请实际上会多申请一些。反正返回的也是虚拟地址,只有访问的时候,才会触发缺页中断而产生实际物理内存映射。
-
缺页异常的信息由CPU提供,但是映射是MMU负责,CPU是如何知道这些信息的呢?
-
vma结构是区间树,不同vma的线性空间完全不同,这个区间是针对什么进行划分的呢?
-
硬链接禁止链接目录,其实说明了inode和dentry在访问上的底层逻辑区别。
-
设备驱动模型、udev、kernfs之箭的的关系。插入设备是先有kobject,还是/dev下的文件,还是先有struct device对应的内容?
- 最先发生的是内核内部的结构创建:当设备被驱动探测到(例如,PCI 设备枚举、USB 设备插入),内核驱动代码会首先创建 struct device 和 kobject。
- 然后是 kernfs 节点的创建:kobject 的注册会触发 kernfs 在 /sys 文件系统中创建对应的目录和属性文件。
- 最后才是 /dev 下的设备文件:内核通过 netlink 发送 uevent,udev 收到后才在 /dev 下创建设备文件。